Learn every Vibeocus surface.
A practical product manual for the desktop app, project workflow, MCP agent context, rules, decisions, documents, secrets, and license activation.
How Vibeocus is organized
Vibeocus is a local-first macOS workspace for product builders and AI agents. It keeps project context, tasks, Markdown memory, rules, relations, documents, secrets, Git activity, and diagrams in one product surface.
How to use it
- 1Create or select a project from the sidebar.
- 2Press and hold a project name in the sidebar, then drag it up or down to set your preferred project order.
- 3Keep the project code path, vault path, and documents path accurate.
- 4Use Tasks for active work, Rules and Decisions for durable project guidance, and Recent Activity for the live project history.
- 5Install MCP tools when external agents need to read project context or update Vibeocus state.
Important notes
Vibeocus is designed so agents do not guess where files, docs, rules, or tasks live.
Most project areas are also available through the MCP server when the user grants access.
Product screenshot
Workspace overview with sidebar, dashboard, and project list

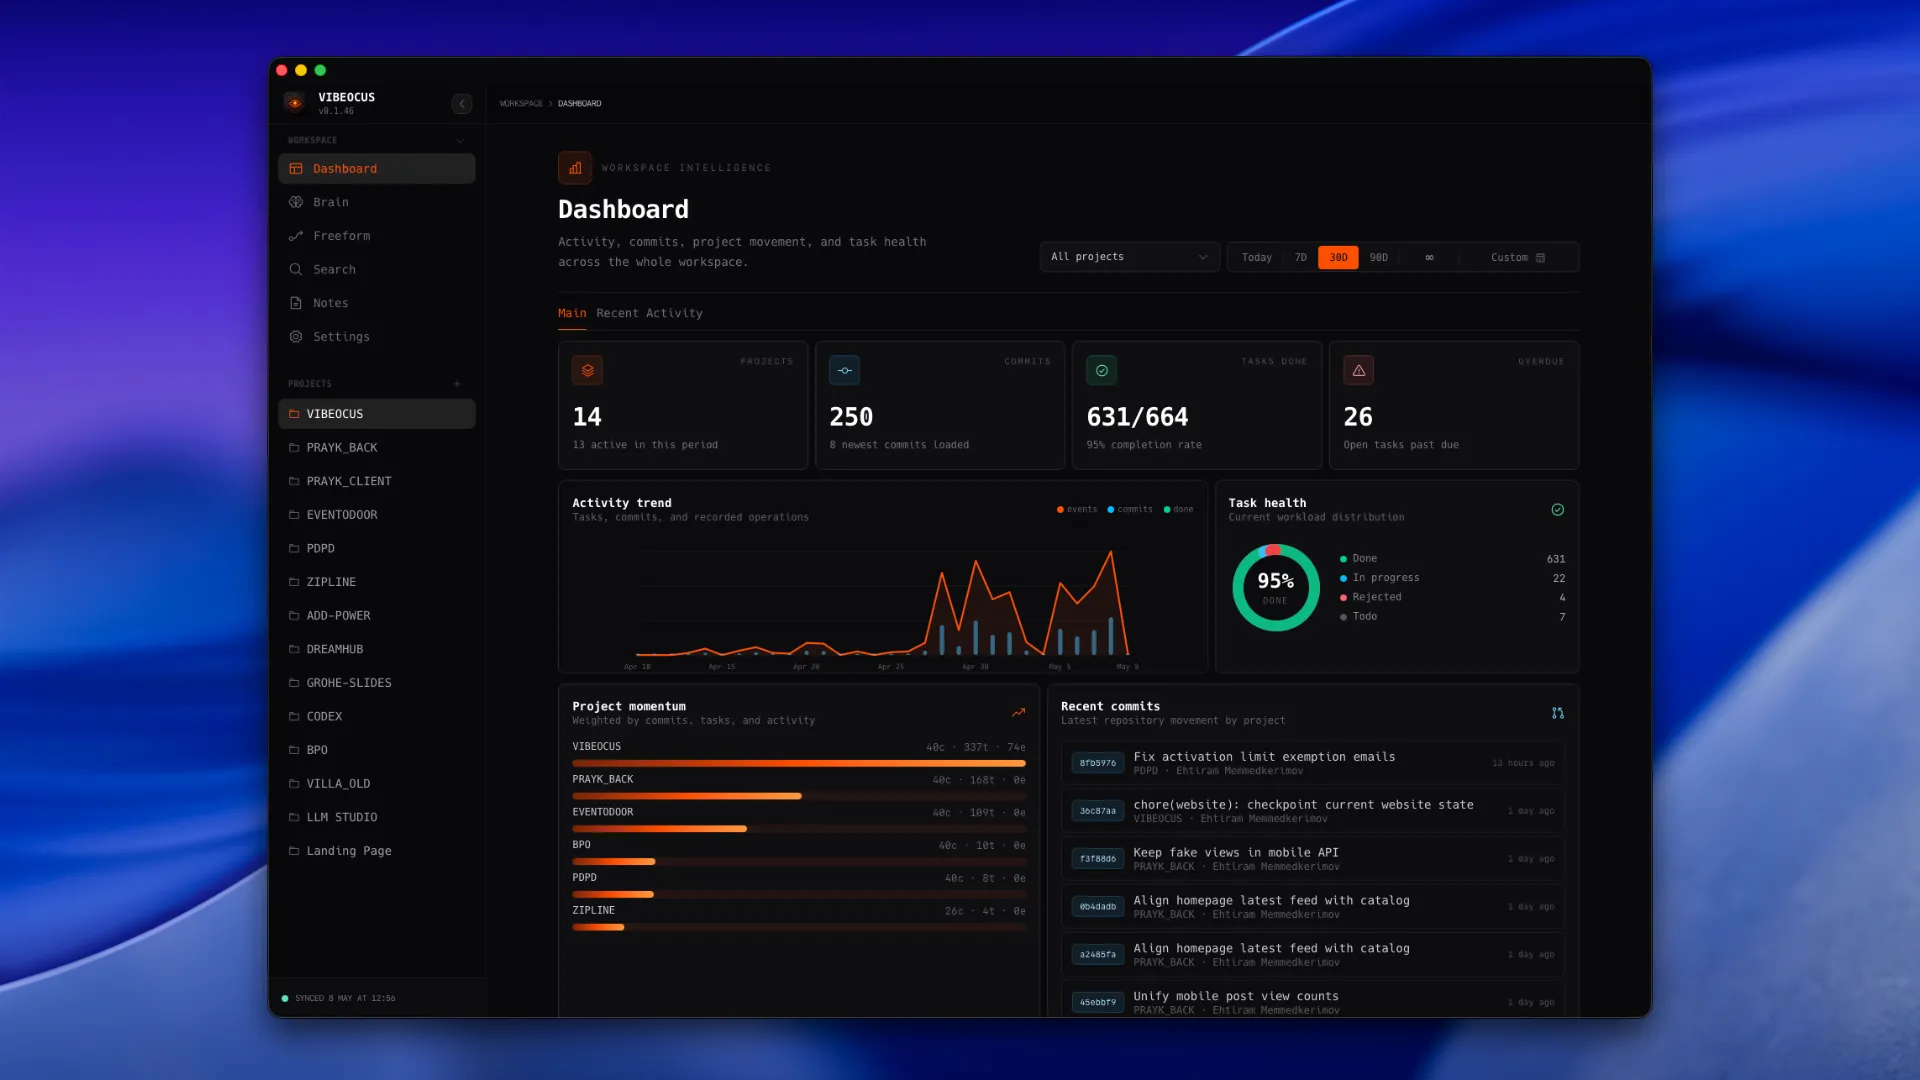
Workspace Dashboard
The workspace dashboard shows activity, commits, project movement, and task health across all projects.
How to use it
- 1Use the project picker to view all projects or filter the dashboard to one project.
- 2Use Today, 7D, 30D, 90D, all-time, or custom ranges to change the data window.
- 3Open Custom range to choose a start and end date from the in-app calendar.
- 4Review Activity trend to understand work volume. Today uses hourly buckets; longer periods use daily buckets.
- 5Open Recent Activity to inspect the exact task, commit, note, document, rule, relation, or vault event.
Important notes
Dashboard cards are read surfaces; edits happen in the matching feature page.
Recent Activity items are intended to be clickable shortcuts into the source entity.
Recent Activity uses 24-hour time so activity is easier to compare across the day.
Product screenshot
Dashboard metrics, activity trend, task health, project momentum, and recent commits
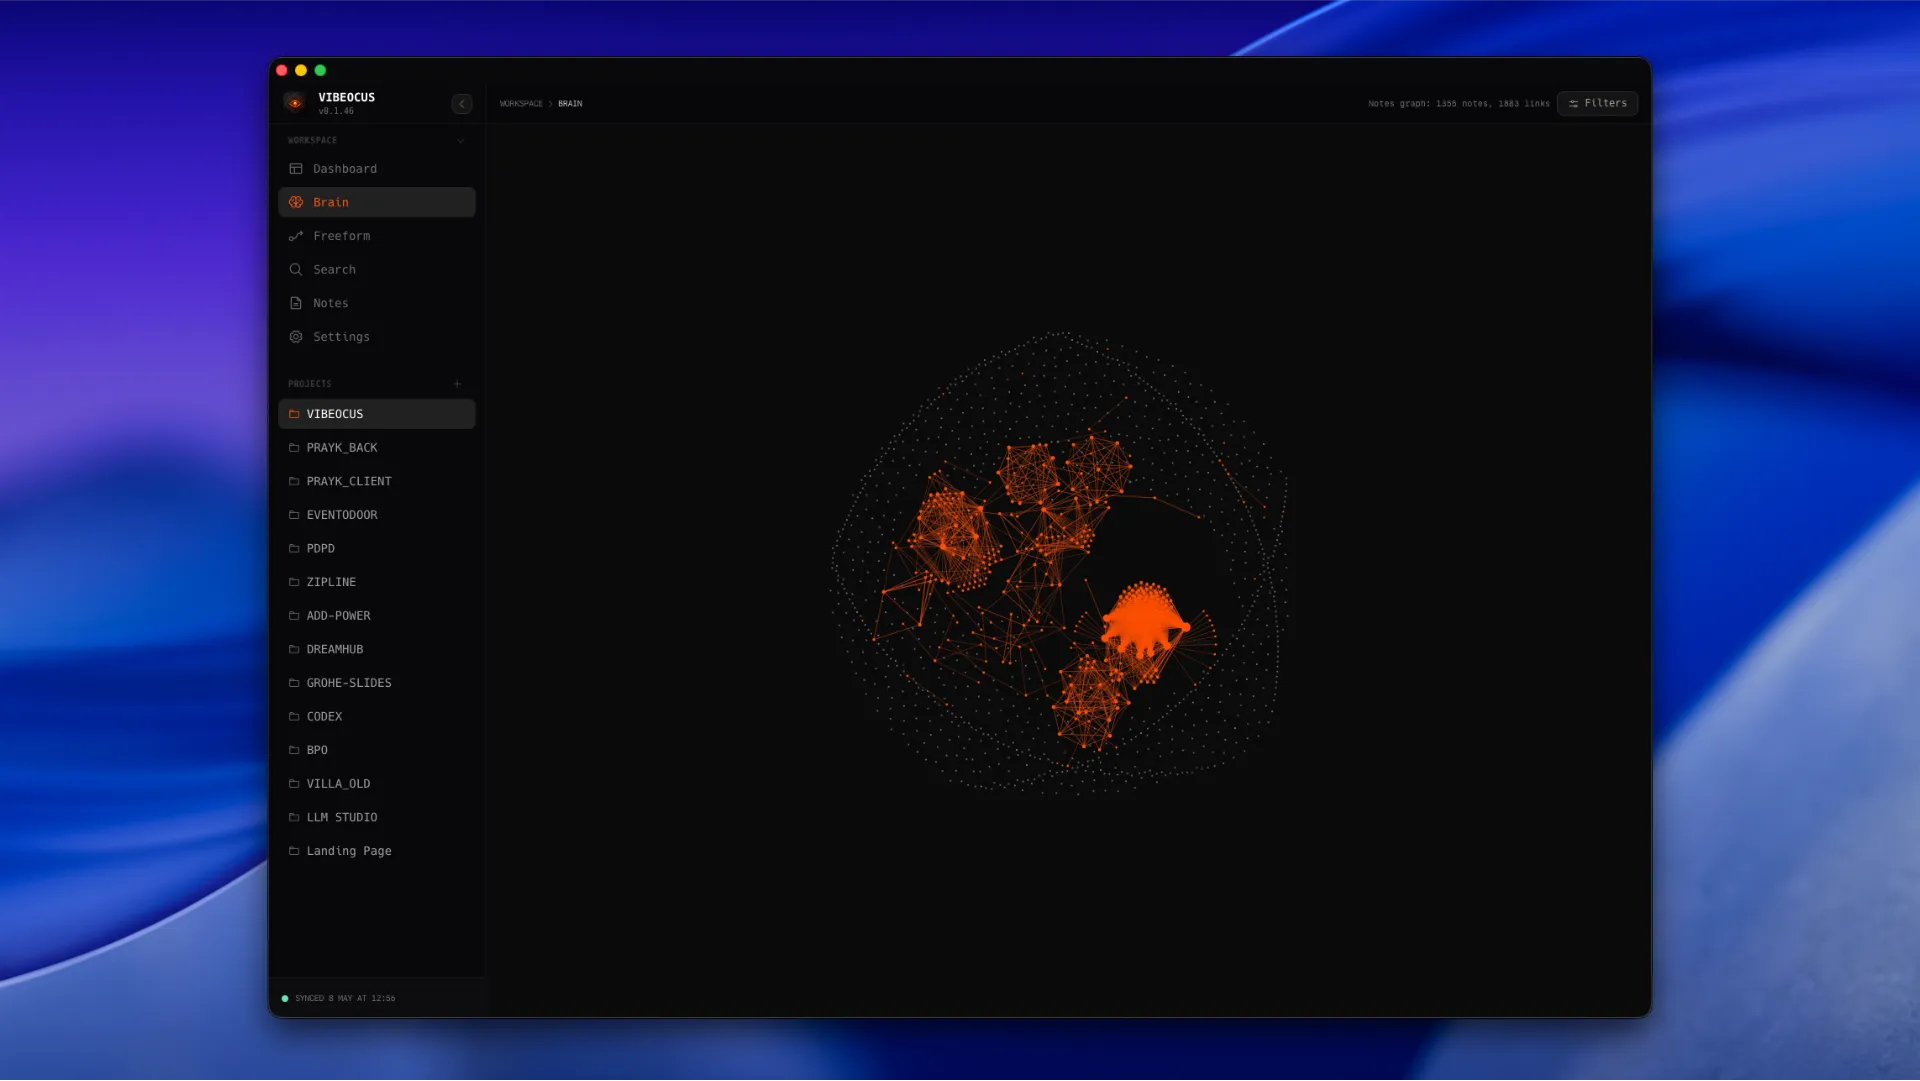
Brain Graph
Brain visualizes project memory and relationships as a graph, helping users and agents understand how files, notes, projects, and activity connect.
How to use it
- 1Open Brain from the workspace sidebar for a global knowledge view.
- 2Open a project dashboard and switch to Brain for a project-scoped graph.
- 3Use graph filters to narrow source, tags, labels, node size, distance, link strength, and drag behavior.
- 4Zoom in for labels and inspect related nodes before planning larger changes.
- 5Use vault links and project relations to make the graph more useful over time.
Important notes
Brain is strongest when vault notes use internal links and progress files are connected.
Graph layout is informational; edit source data in Vault, Notes, Relations, Tasks, or Documents.
Product screenshot
Brain graph with linked project memory nodes
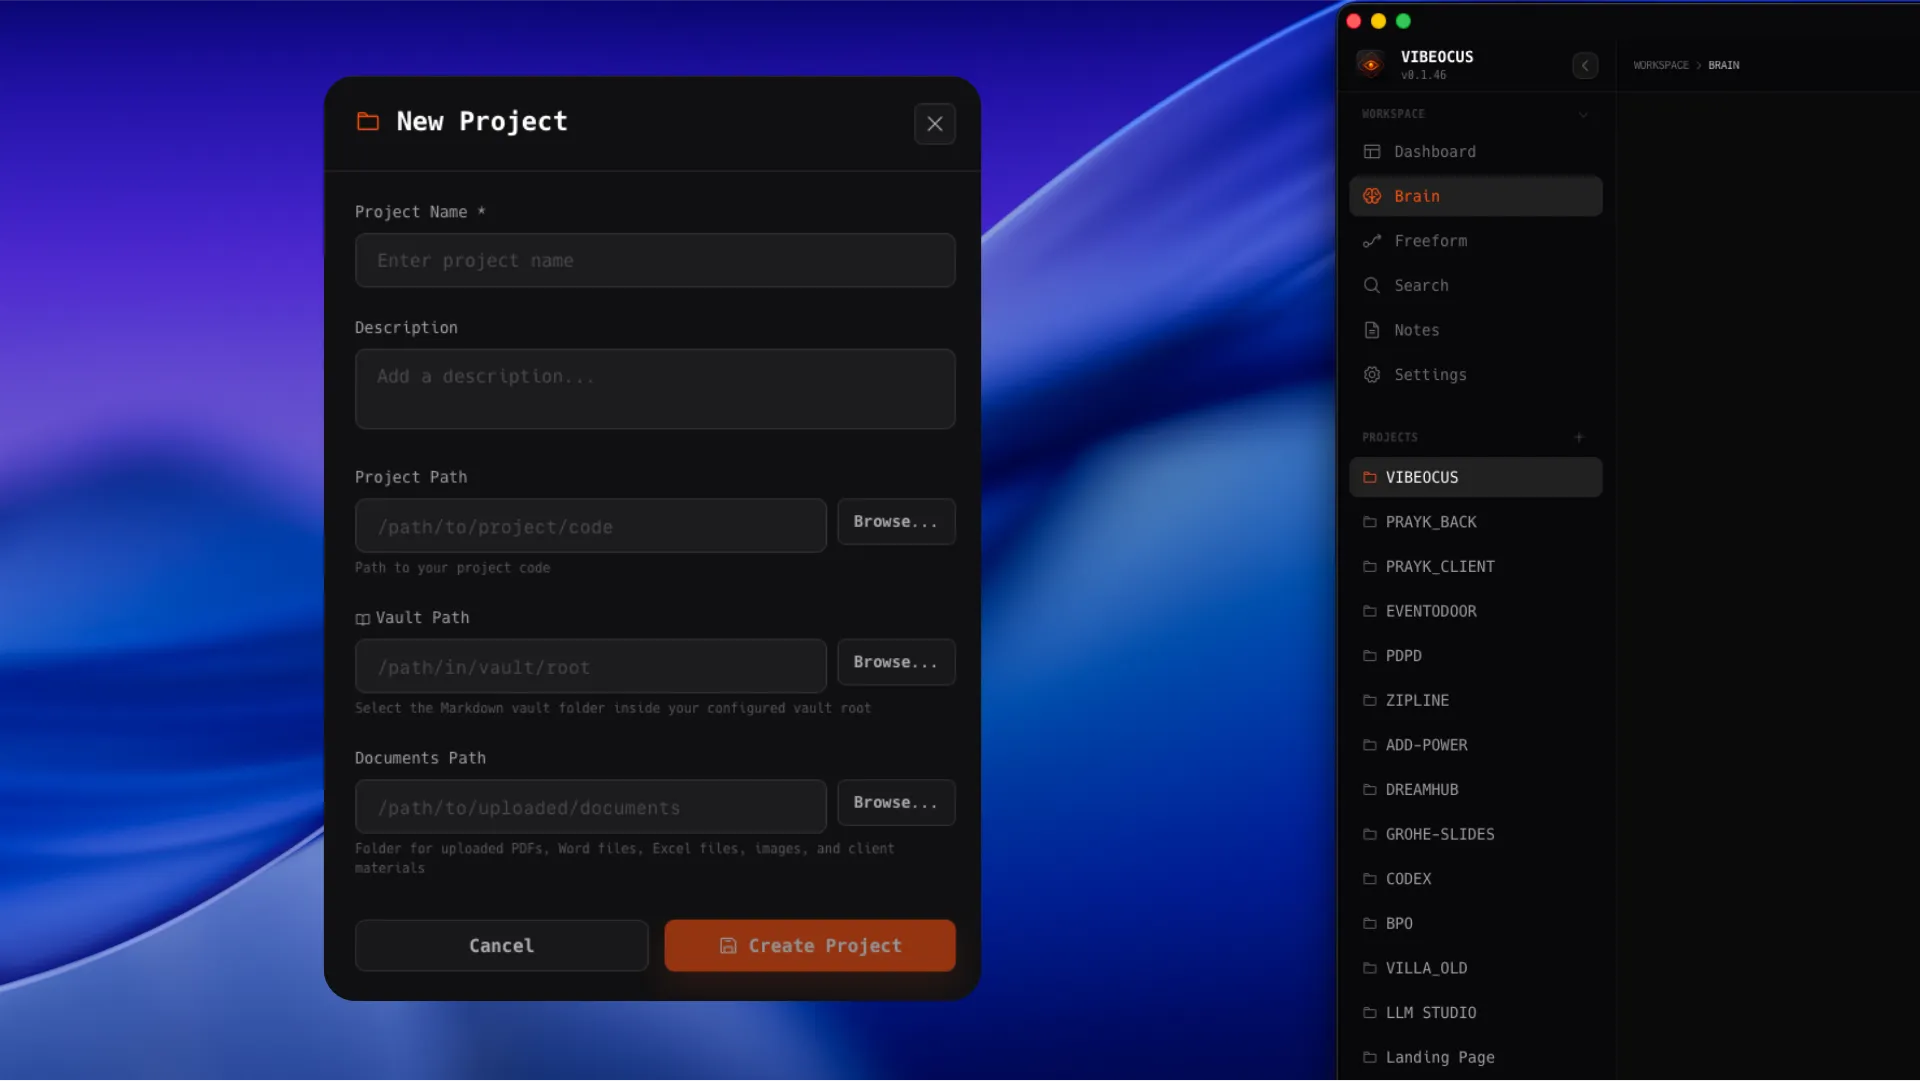
Projects and paths
A project is the central unit in Vibeocus. Each project stores code location, vault location, documents location, tasks, rules, relations, Git data, and activity.
How to use it
- 1Create a project and select the real repository folder as the code path.
- 2Set the vault path for Markdown project memory and progress notes.
- 3Set the documents path for uploaded files and external reference material.
- 4Reorder projects directly in the sidebar by holding the project name and dragging it to the new position.
- 5Keep project names short and stable because they appear in dashboards, search, project relations, and agent context.
Important notes
Agents should use Vibeocus-returned paths instead of guessing folders.
Sidebar project order is saved and reused by dashboards, project pickers, and workspace navigation where relevant.
Product screenshot
Project list and project settings paths
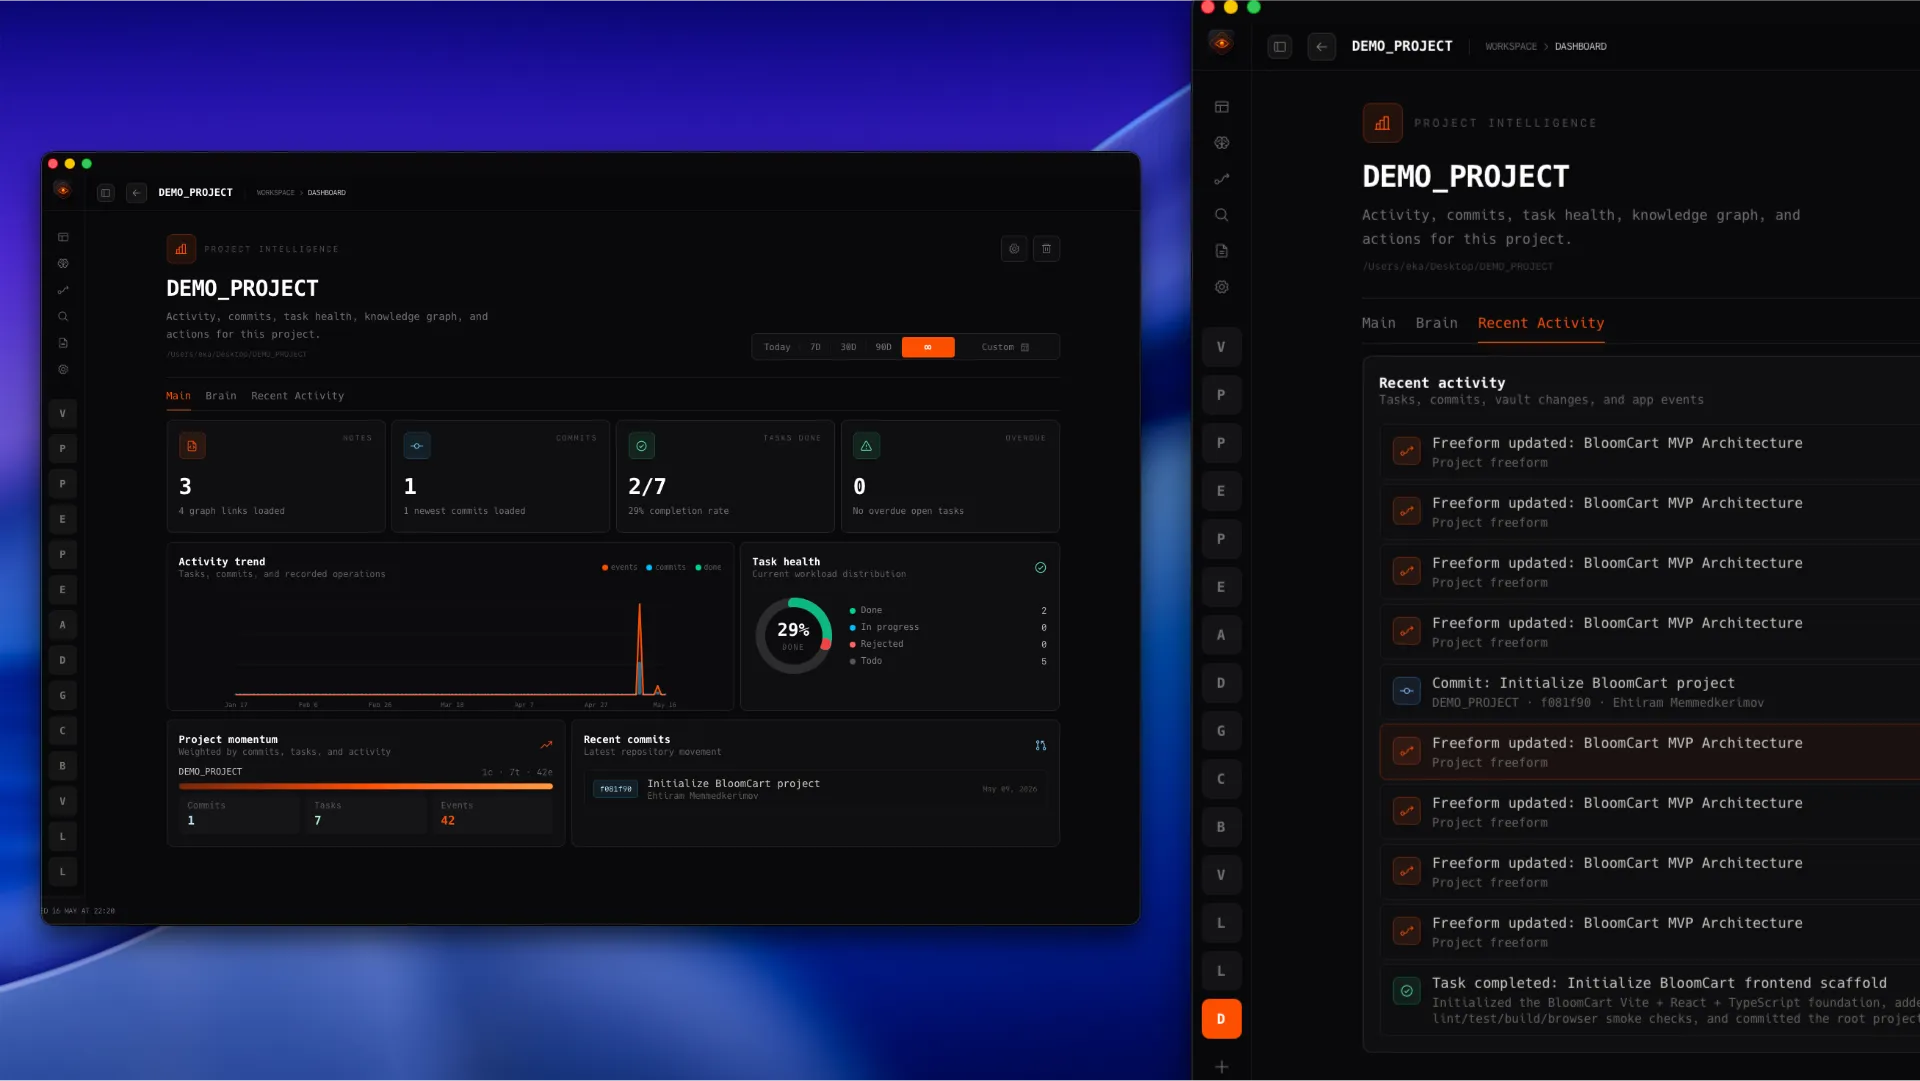
Project Dashboard
The project dashboard narrows metrics, commits, task health, project momentum, brain graph, and recent activity to one selected project.
How to use it
- 1Use Main for project metrics, recent commits, task health, and momentum.
- 2Use Brain to inspect the project graph without leaving the dashboard.
- 3Use Recent Activity to audit what changed in that project and open the related item.
- 4Use Today, 7D, 30D, 90D, all-time, or Custom date filters to compare activity before planning work.
- 5Open the graph filter panel inside the Brain tab when you need to narrow the project graph.
Important notes
Project dashboard data is project-scoped, while workspace dashboard data can aggregate all projects.
Project Momentum is weighted from commits, tasks, and activity.
Recent Activity shows date and 24-hour time for tasks, commits, vault changes, and app events.
Product screenshot
Project dashboard with Main, Brain, and Recent Activity tabs
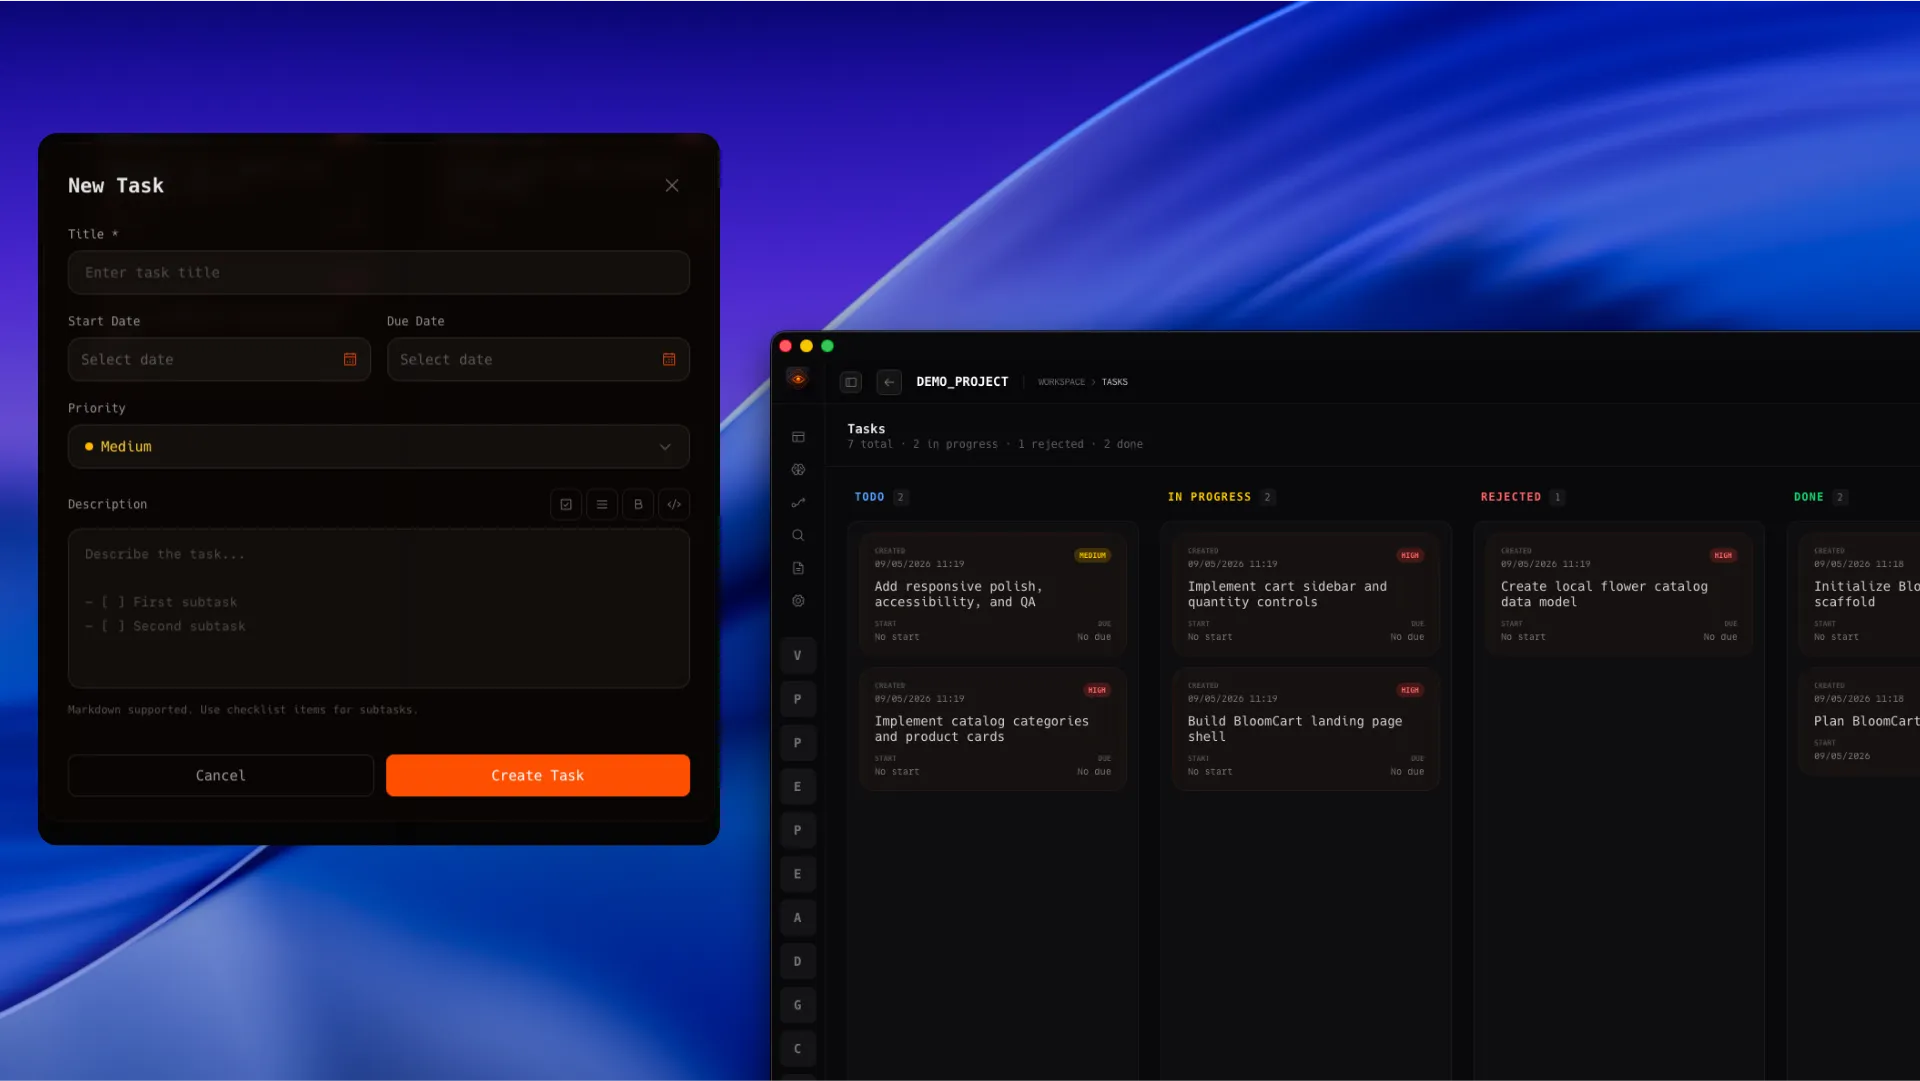
Tasks
Tasks track project work from planning to completion with todo, in progress, rejected, and done states.
How to use it
- 1Create a task from the Tasks page or through MCP.
- 2Set title, dates, priority, status, and Markdown description.
- 3Use the task date picker to set start and due dates without leaving the task form.
- 4Move cards between columns, or reorder cards inside a column, by dragging them on the Kanban board.
- 5Open a card to read full details, update status, priority, dates, description, or inspect subtasks.
- 6Use Recent Activity to jump back to tasks that were created, updated, or completed.
Important notes
Production work should have a task so there is an auditable trail.
Task descriptions support Markdown, including checklist-style subtasks.
Task cards show created, start, and due dates so planning context stays visible on the board.
Product screenshot
Kanban board, task modal, date picker, priority, and task detail view
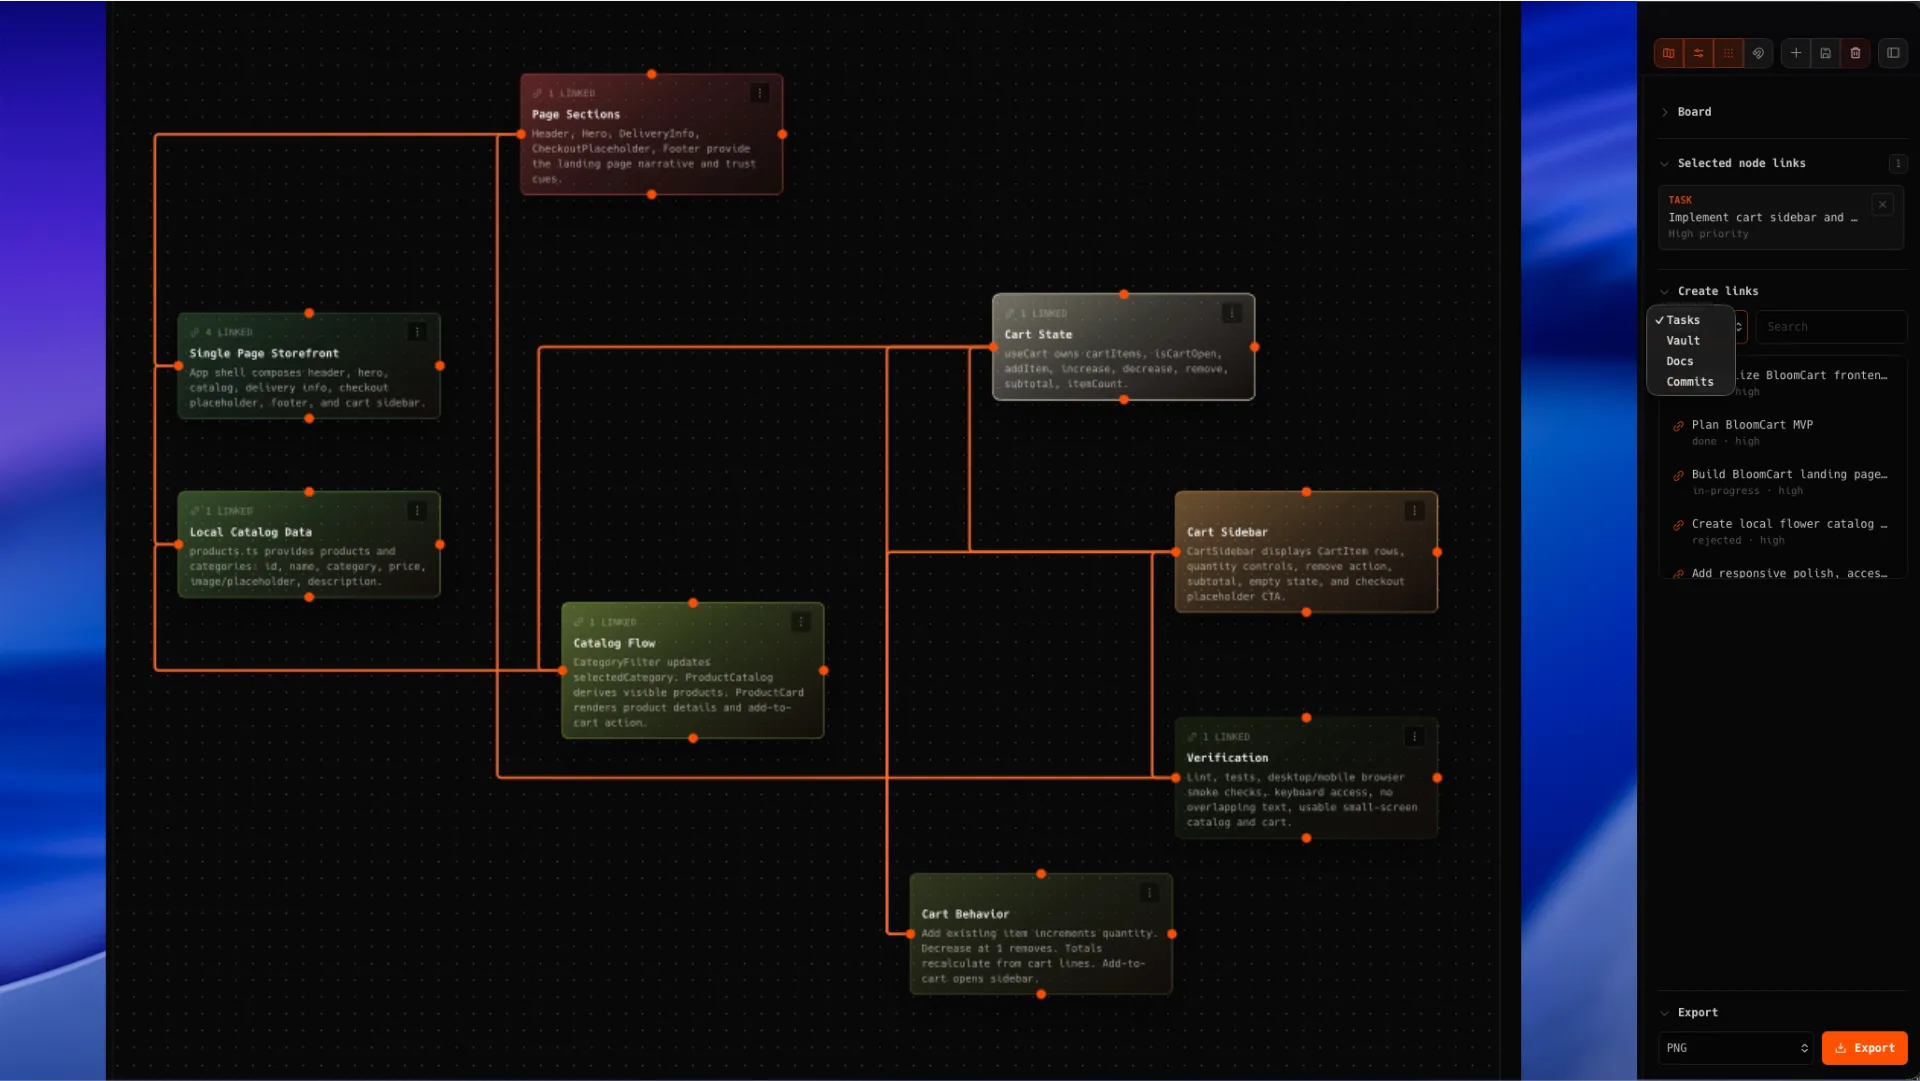
Freeform boards
Freeform is a visual canvas for architecture maps, process diagrams, dependency maps, planning boards, and agent-created visual plans.
How to use it
- 1Create a workspace or project Freeform board.
- 2Double-click the canvas or use the toolbar to add nodes.
- 3Drag handles to connect nodes and describe flows or dependencies.
- 4Link project Freeform nodes to tasks, vault files, documents, or Git commits.
- 5Export boards as visual files or JSON when you need to share the plan.
Important notes
Project Freeforms can link to project entities; workspace Freeforms are broader planning boards.
MCP tools can create and update Freeform boards using React Flow-compatible nodes and edges.
Product screenshot
Freeform board with linked nodes, right inspector, and export controls
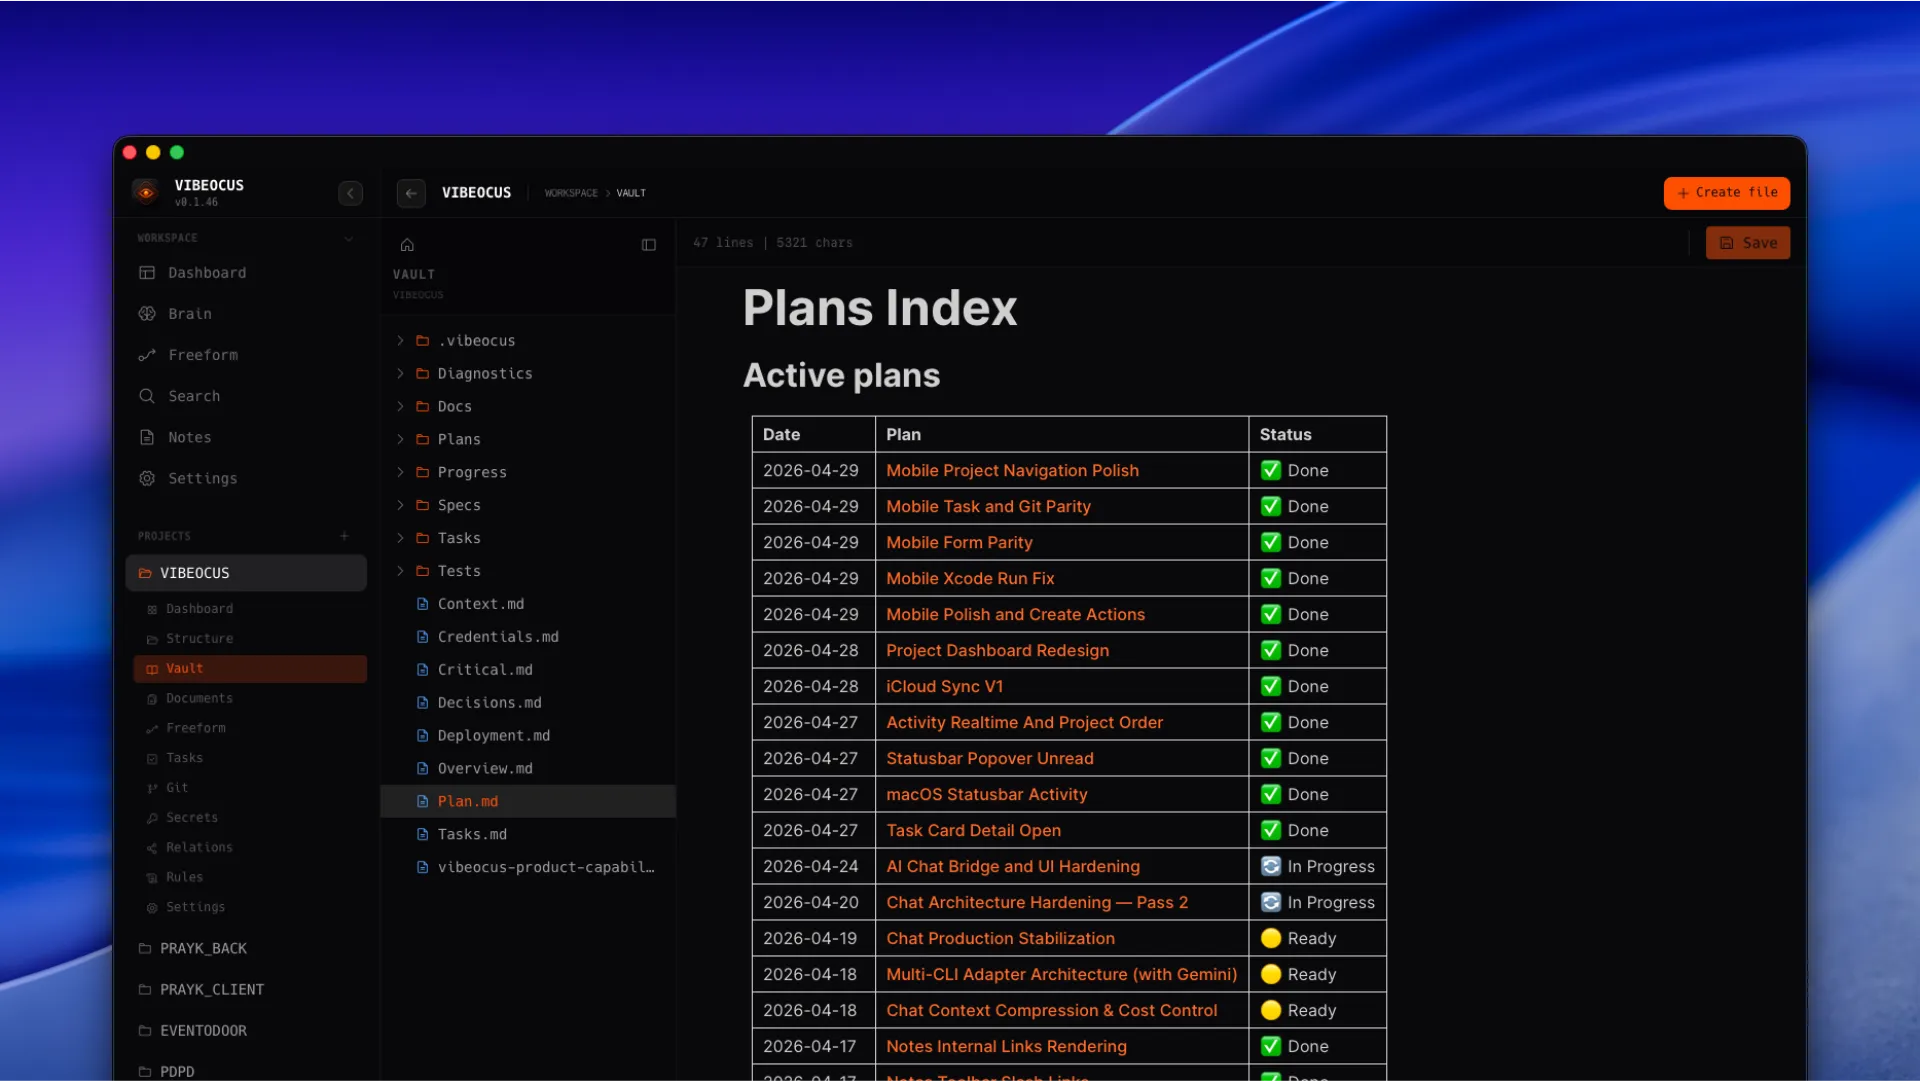
Vault
The Vault is the project Markdown knowledge base. It stores architecture notes, progress logs, specs, launch checklists, decisions, and release notes.
How to use it
- 1Create Markdown files inside the project vault.
- 2Use the same rich Markdown editor and slash commands used by Notes and Rules documents.
- 3Use internal links to connect decisions, progress notes, specs, and related files.
- 4Keep progress files chained with previous and next links when documenting larger work.
Important notes
Vault files are graph-friendly memory, not random scratch files.
Agents should write progress to the project vault when work materially changes project state.
Product screenshot
Vault tree, Markdown editor, slash commands, and linked project notes
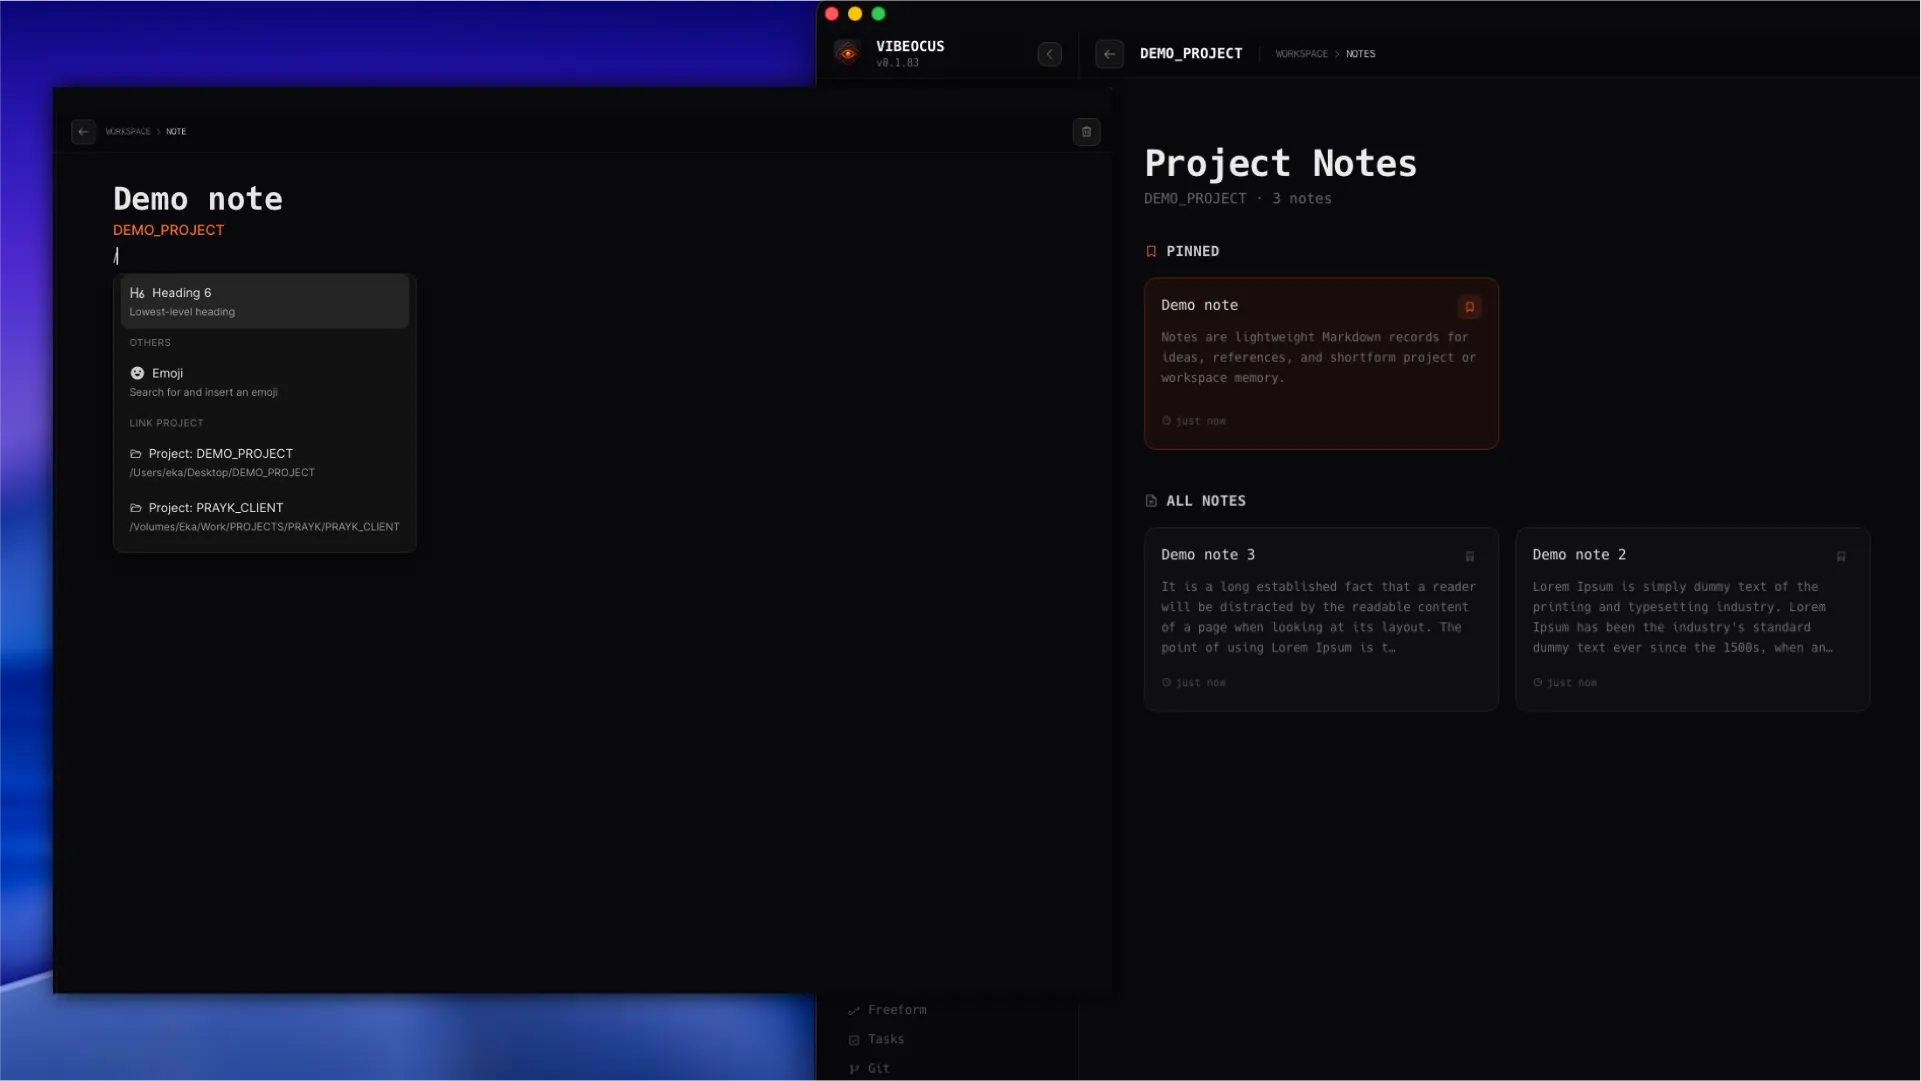
Notes
Notes are lightweight Markdown records for ideas, references, and short-form project or workspace memory.
How to use it
- 1Create a workspace note or project note depending on the context.
- 2Filter workspace notes by project when the notes list grows.
- 3Pin important notes so they stay visible at the top of the list.
- 4Use Markdown and internal links for durable references.
- 5Use search when a workspace has many notes.
Important notes
Use Vault for structured long-term project memory and Notes for lighter records.
Notes can appear in search and activity when changed.
Product screenshot
Notes list, pinned notes, editor, and slash command menu
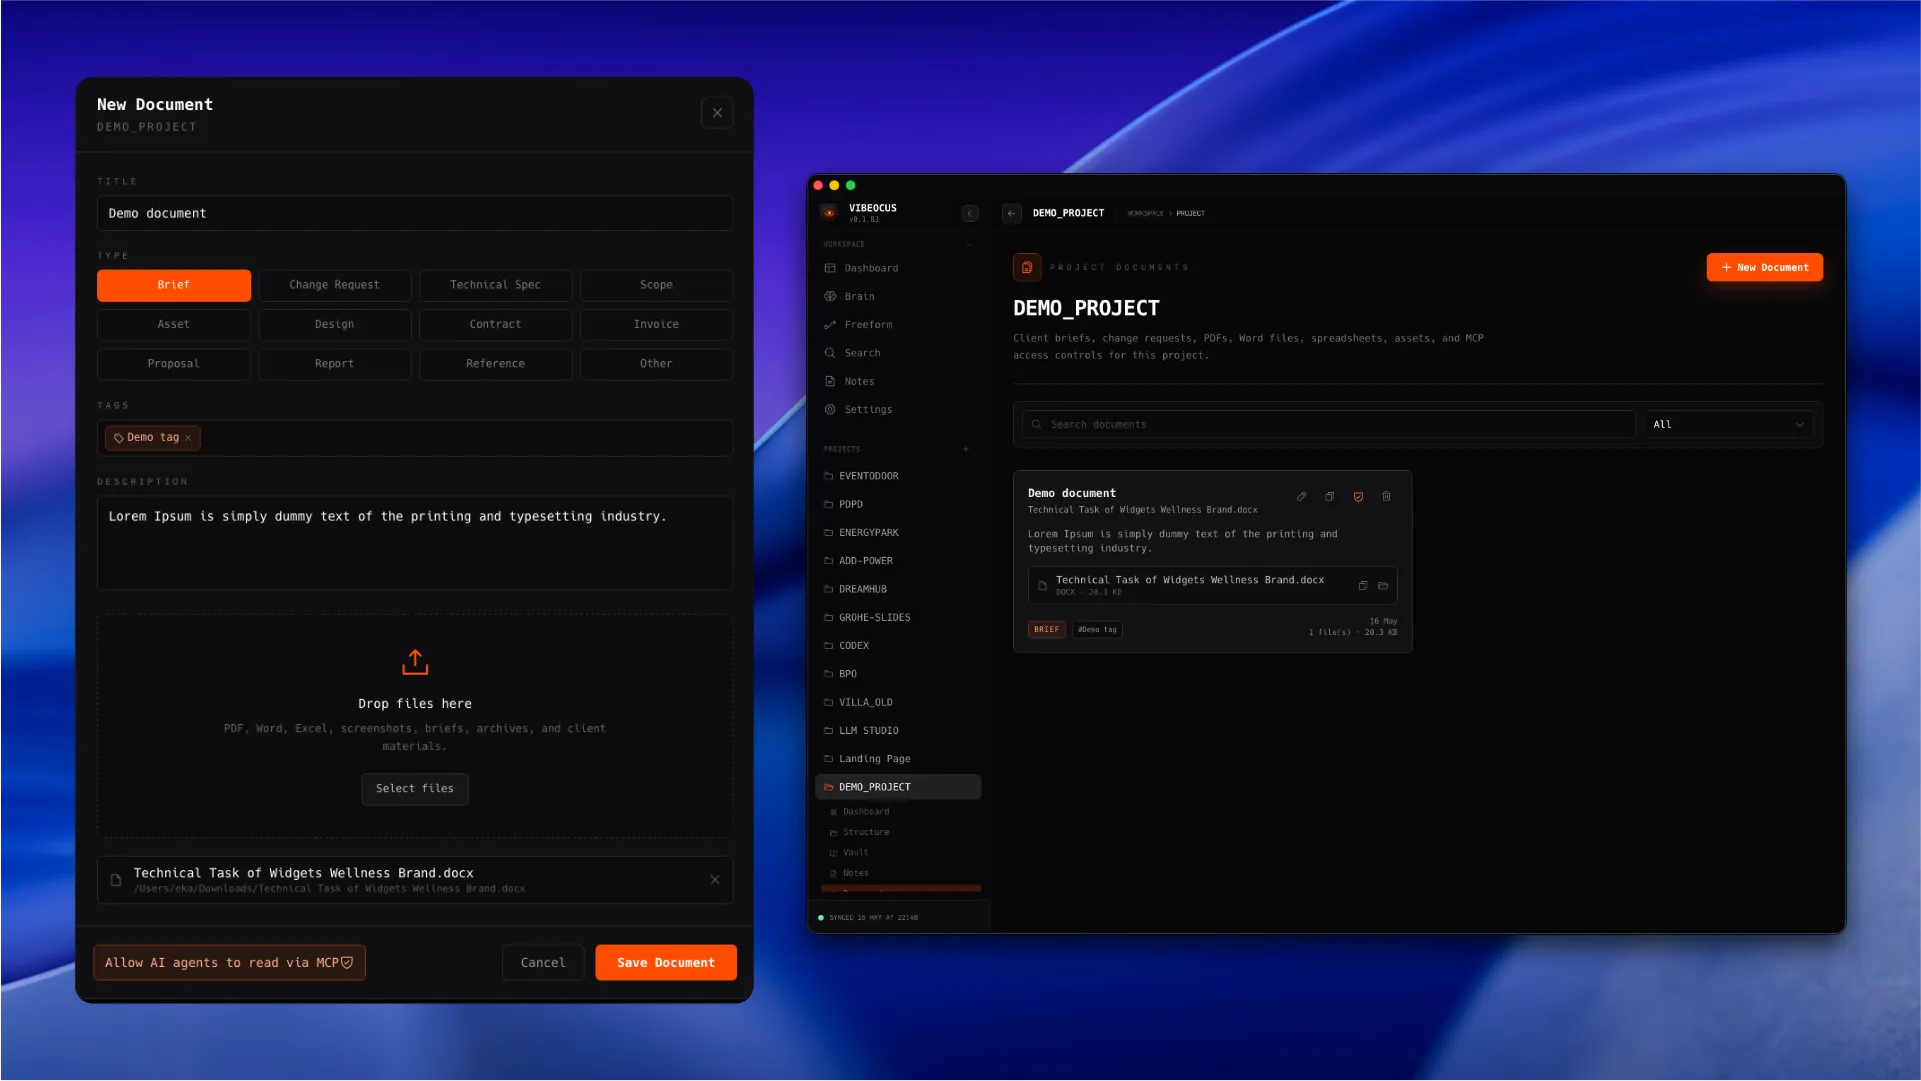
Documents
Documents store uploaded project files with metadata, tags, previews, search, and optional MCP access.
How to use it
- 1Upload PDFs, screenshots, specs, contracts, or client files to the project Documents page.
- 2Add a useful title, description, tags, and file type metadata.
- 3Use search and file-type filters to narrow large document libraries.
- 4Preview files from the document list before opening them externally.
- 5Enable MCP access only for documents that agents are allowed to read.
Important notes
Documents are separate from the Markdown vault because uploaded binary files need metadata and access control.
Per-document MCP access keeps sensitive files out of agent context by default.
Product screenshot
Documents library, upload modal, preview panel, tags, and MCP access toggle
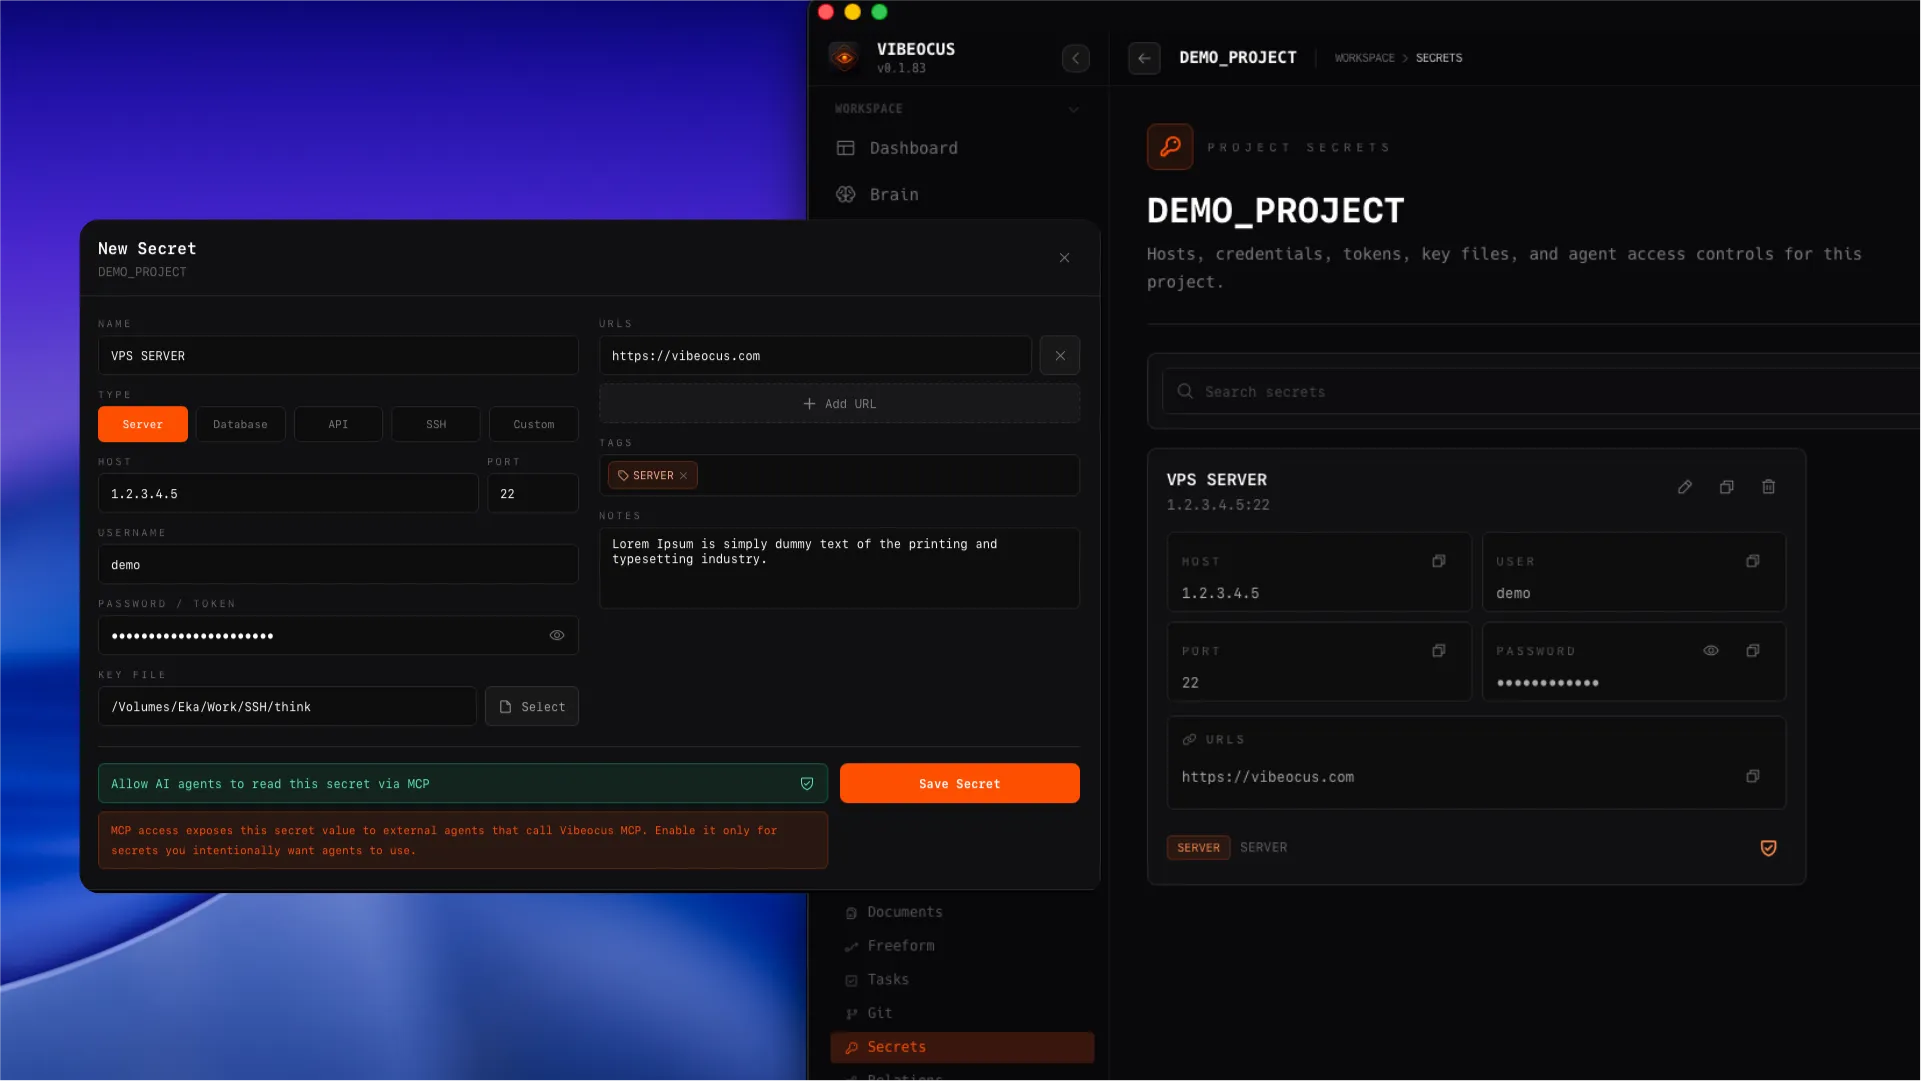
Secrets
Secrets keep project credentials local while allowing carefully selected values to be exposed to agents when needed.
How to use it
- 1Create secrets for SSH, API keys, logins, tokens, URLs, and related credentials.
- 2Use search and type filters to find a credential without exposing unrelated secrets.
- 3Use copy buttons for individual fields instead of exposing credentials in notes.
- 4Open the preview modal to inspect the stored fields.
- 5Allow MCP access only for a specific secret when an agent task requires it.
Important notes
Do not store secrets in Vault, Notes, or task descriptions.
Per-secret MCP access is intentionally explicit.
Product screenshot
Secrets cards, preview modal, copy actions, and per-secret MCP access control
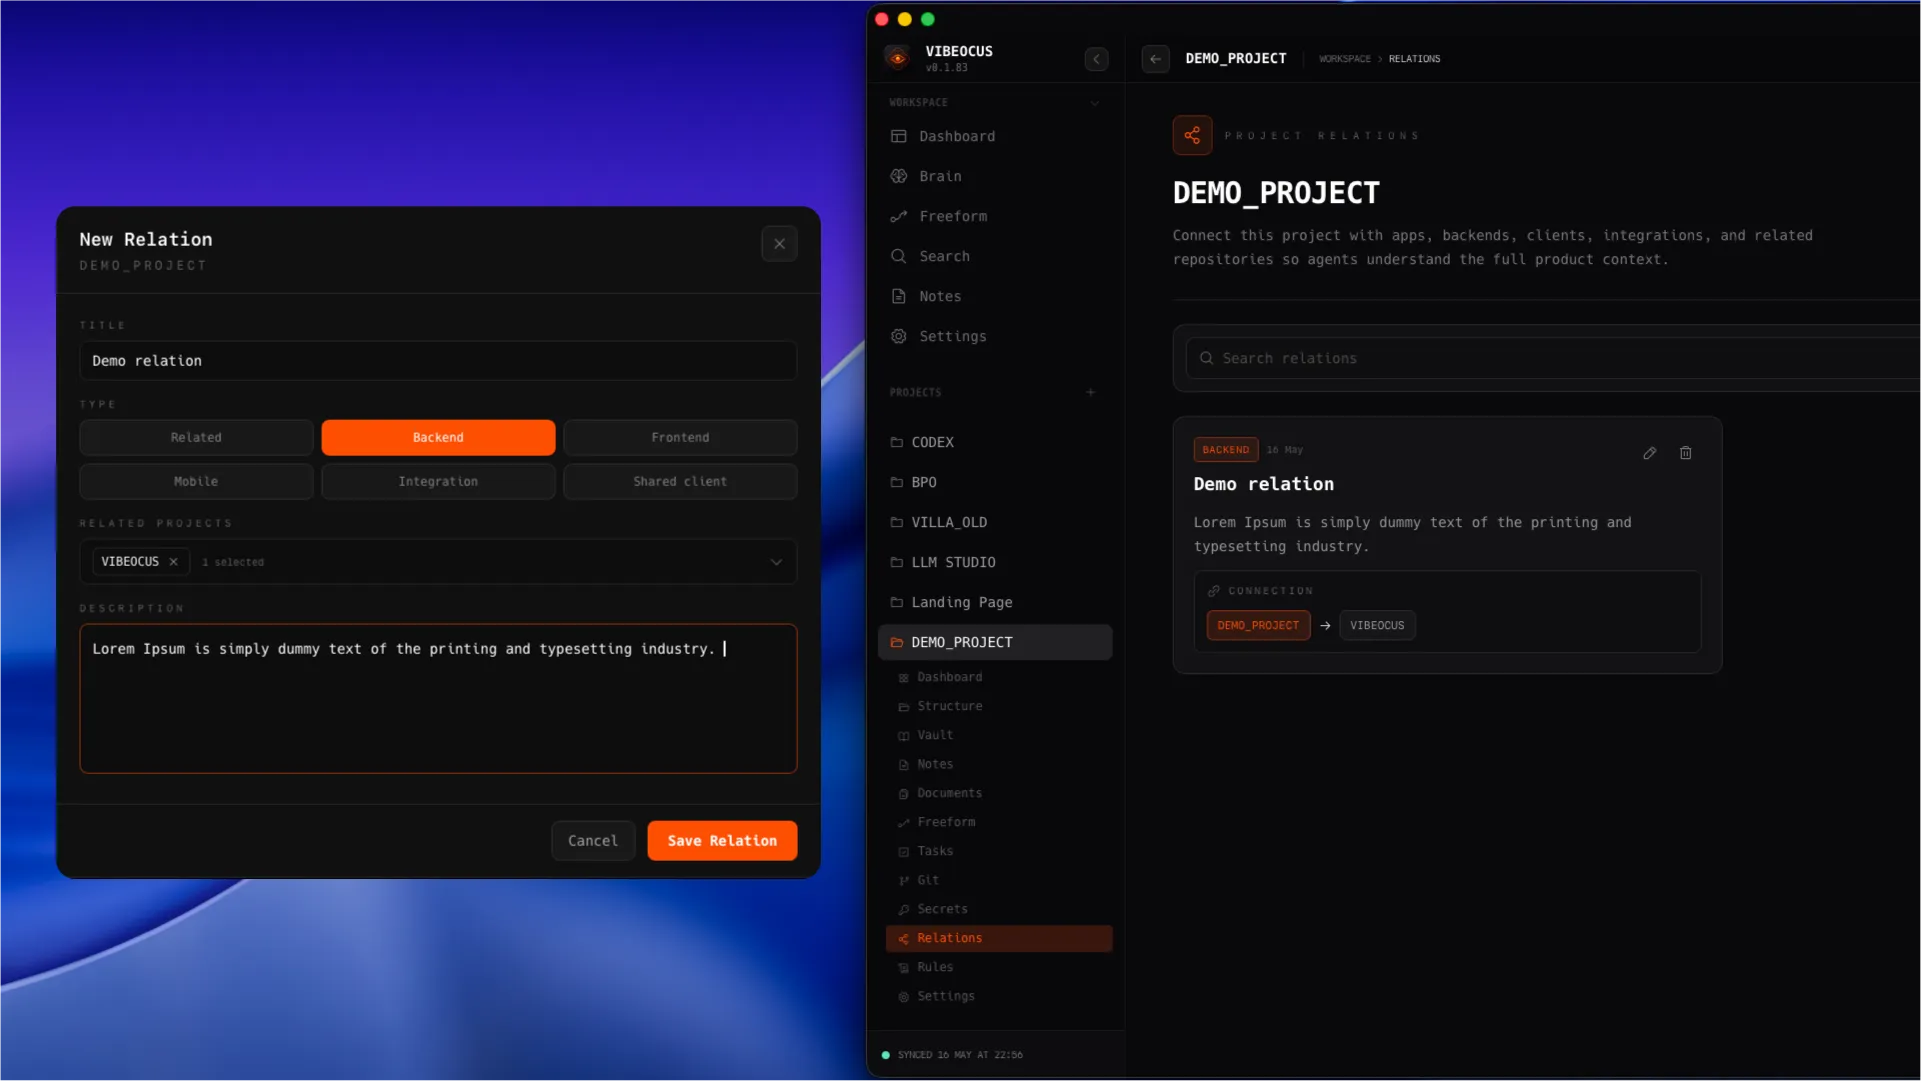
Relations
Relations connect one project to related projects so the app and agents understand product context beyond a single repository.
How to use it
- 1Create a relation from a project Relations page.
- 2Choose the relation type: related, backend, frontend, mobile, integration, or shared client.
- 3Search and select one or more related projects from the project picker.
- 4Write a clear description that explains why the projects are connected.
- 5Use relation cards to see the source project and connected project together.
Important notes
One relation can describe one connection from the current project to another project.
Relations are part of the mandatory MCP context lookup for agents.
Product screenshot
Relation card, connected projects, relation type, and creation modal
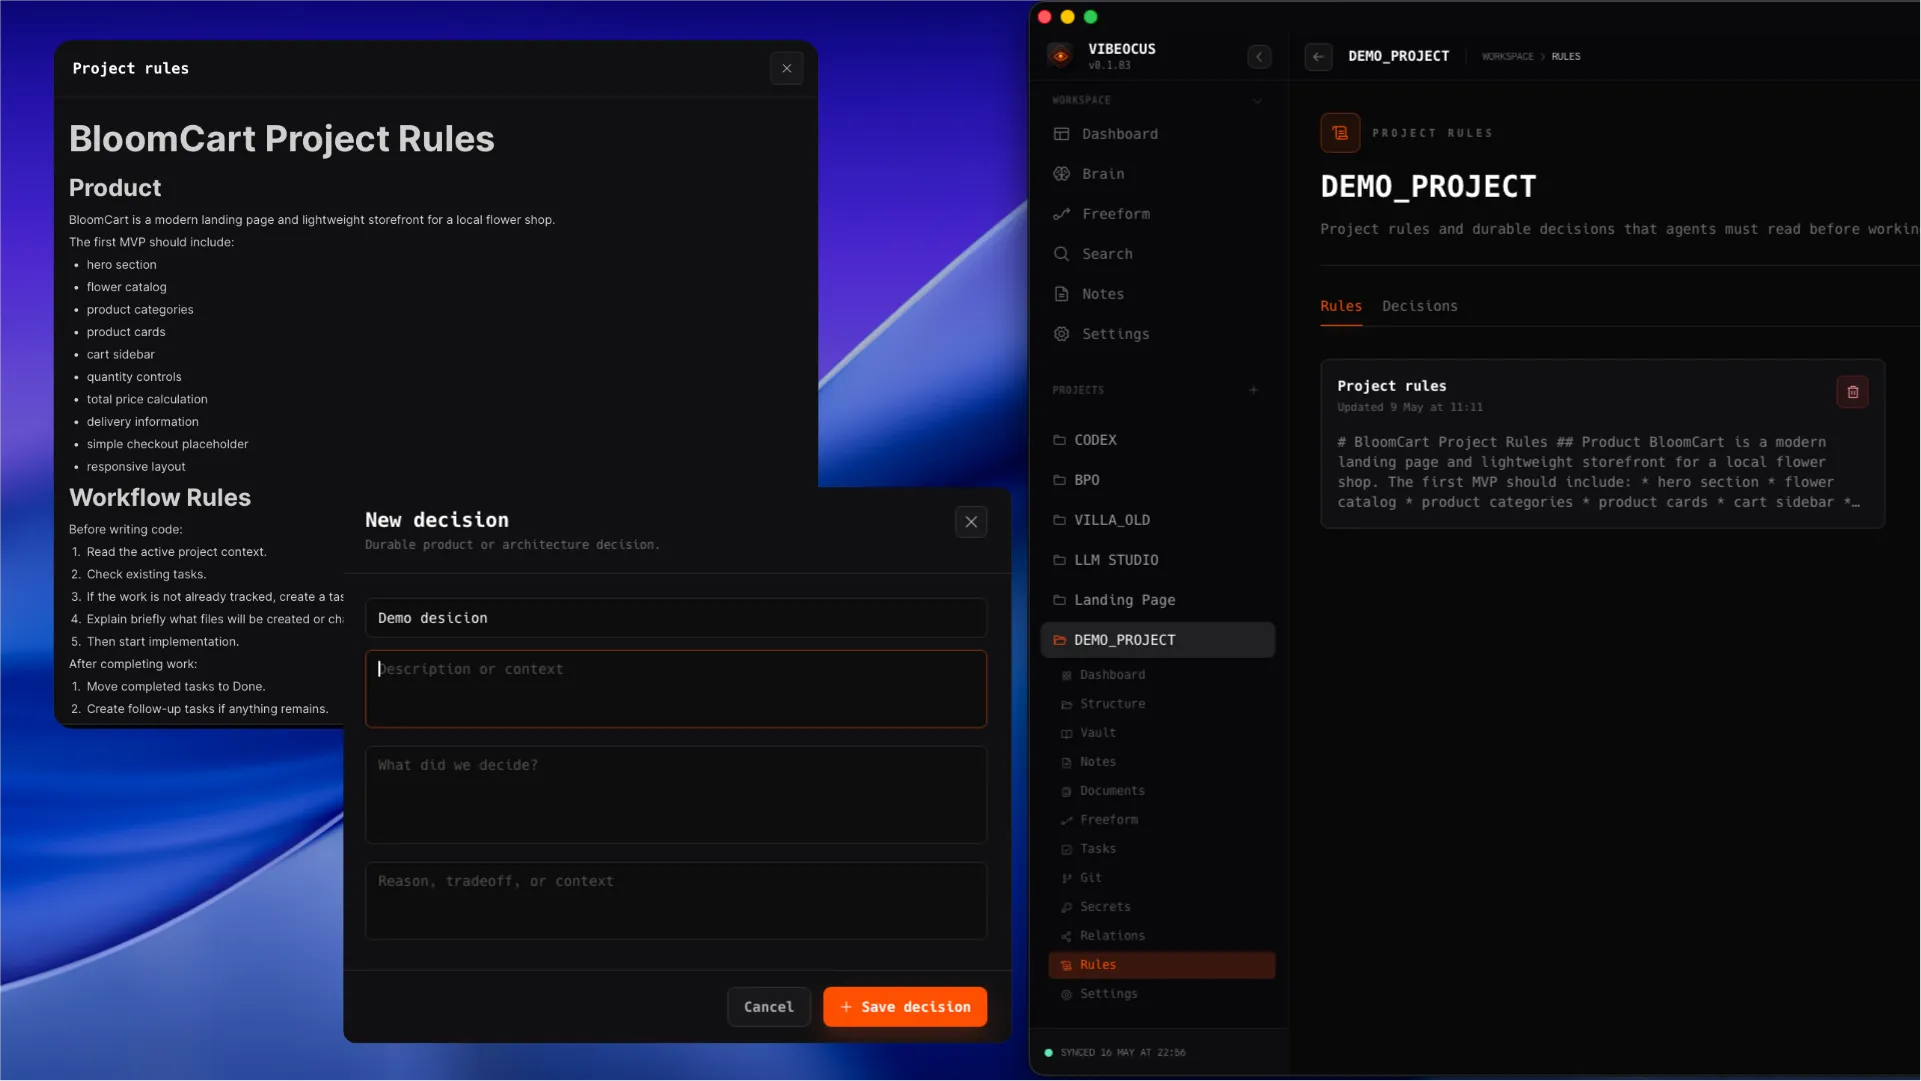
Rules and Decisions
Rules and Decisions is the project guidance surface agents must read before doing work. Rules store durable Markdown instructions; Decisions store structured product, architecture, workflow, or release choices with context and reasoning.
How to use it
- 1Open Rules from a project sidebar.
- 2Use the Rules tab for durable Markdown instructions such as coding standards, architecture constraints, design rules, release rules, and agent instructions.
- 3Create or edit rule documents with the shared Markdown editor, slash commands, internal links, autosave status, and updated timestamp.
- 4Use the Decisions tab for durable choices that should not be buried in chat: what was decided, why it was decided, and the context behind it.
- 5Create decisions with a title, optional context, the decision text, and the reason or tradeoff.
Important notes
Rules are Markdown instruction documents. Decisions are structured records for product, architecture, workflow, and release choices.
The MCP server exposes both rules and active decisions, so agents can read them before analysis, planning, coding, debugging, docs, build, or release work.
Use Rules for standing instructions. Use Decisions when a choice has been made and future work needs to preserve that context.
Product screenshot
Rules and Decisions page with tabs, rule cards, decision cards, Markdown rule editor, and decision form
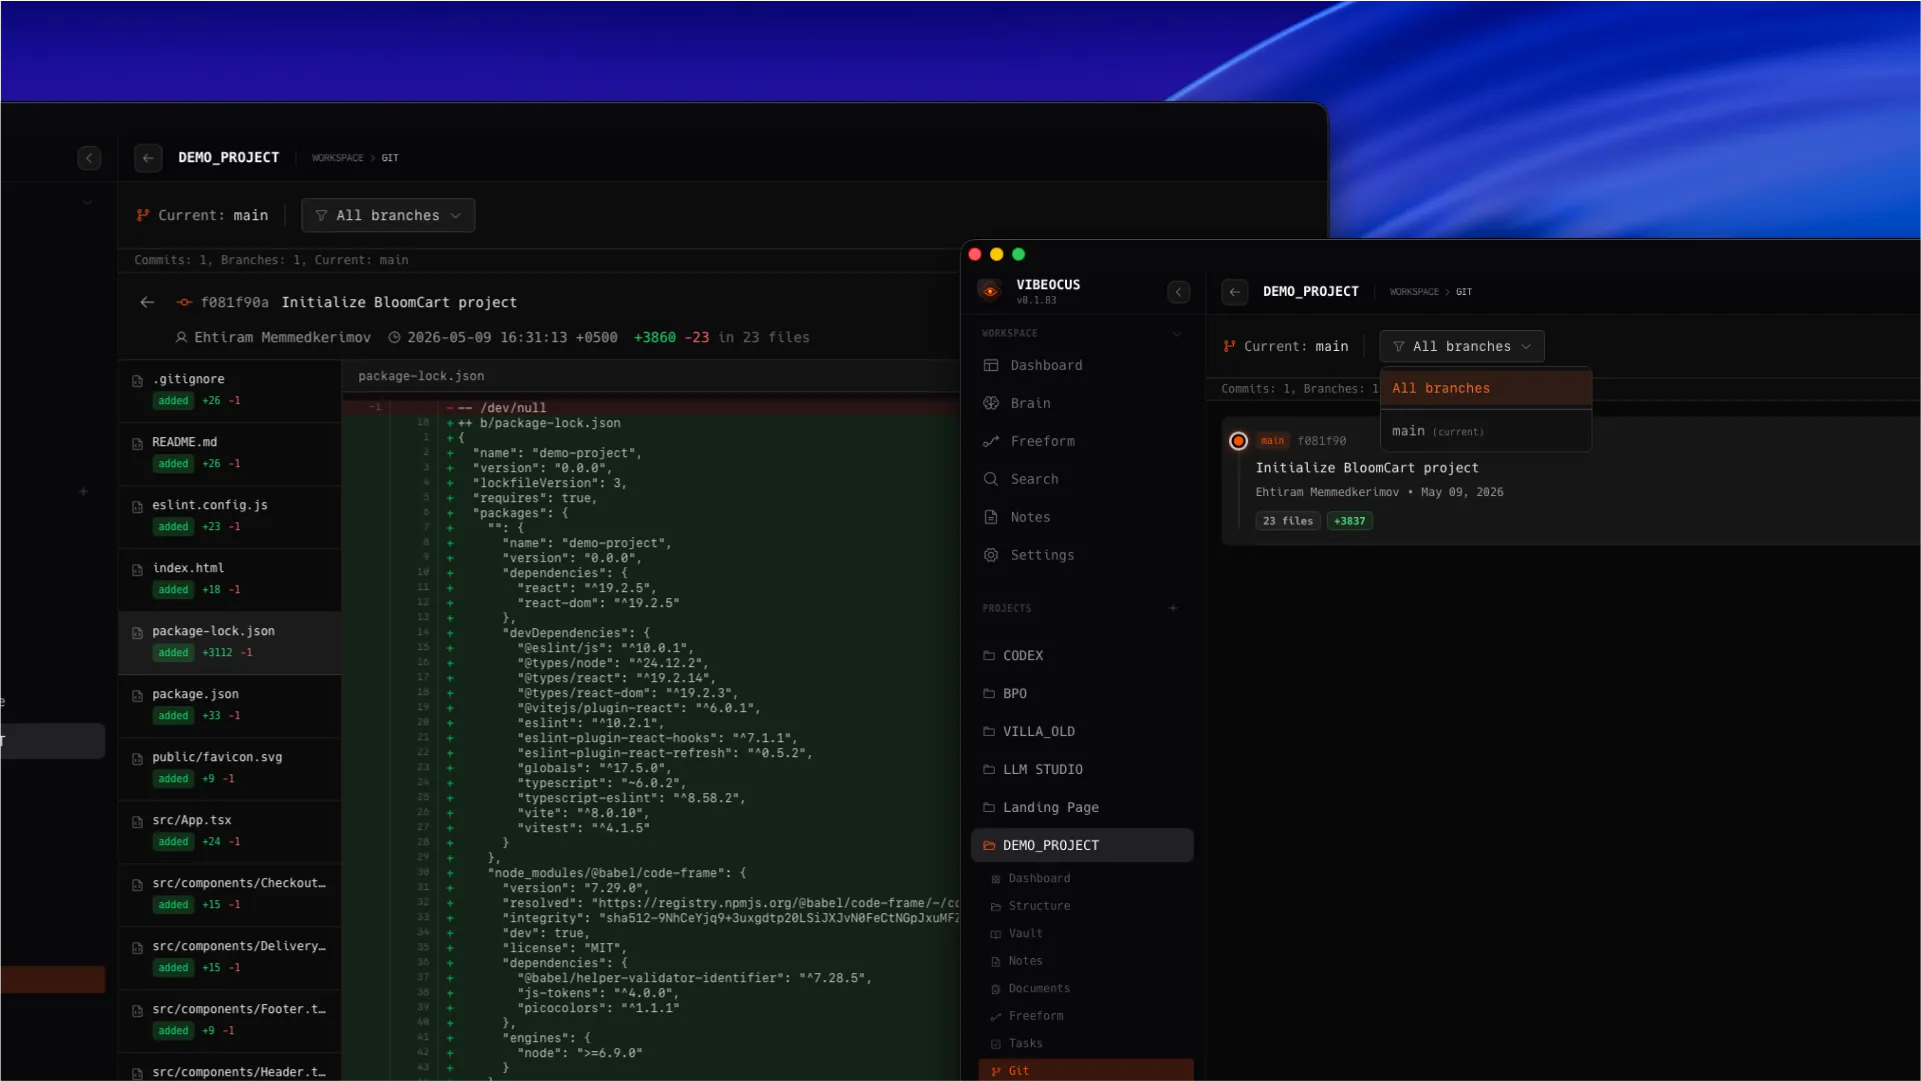
Git
Git is a read-focused project context surface for commits, branches, diffs, file stats, and recent repository movement.
How to use it
- 1Open Git from a project sidebar.
- 2Filter commits by branch when a repository has multiple active lines of work.
- 3Click a commit to inspect changed files and diffs.
- 4Use recent commits on dashboards to understand active project movement.
Important notes
Vibeocus keeps Git actions conservative and context-focused.
Recent Activity and dashboards can link directly into commit details.
Product screenshot
Git commit list, branch dropdown, commit stats, and diff viewer
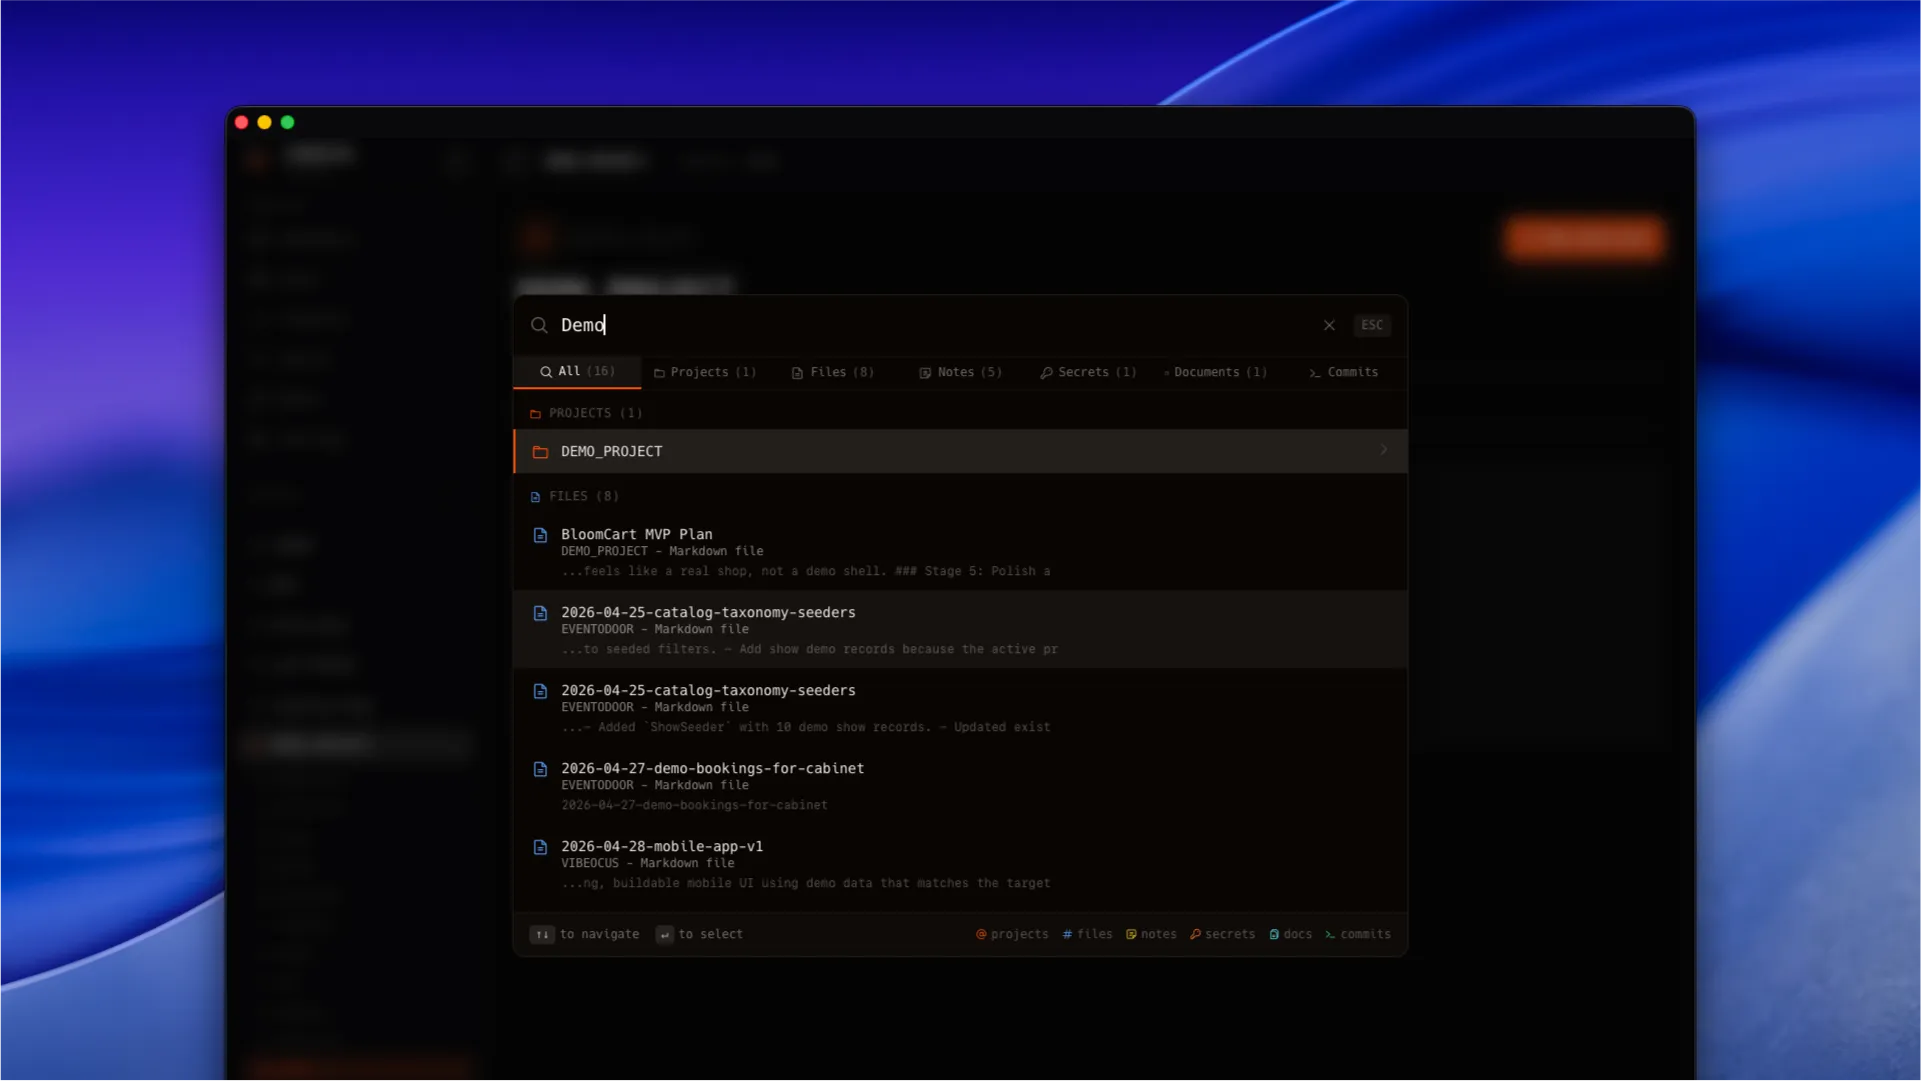
Search
Search helps users jump across projects, files, notes, secrets, documents, commits, and other indexed workspace entities.
How to use it
- 1Open Search from the workspace sidebar.
- 2Type a query and narrow results with entity filters.
- 3Use keyboard navigation to move from the input into results.
- 4Select a result to open the matching project, file, note, secret, document, or commit.
Important notes
Search is a navigation tool, not only a text filter.
Good titles and tags improve search quality across the workspace.
Product screenshot
Search overlay with filters and keyboard navigation
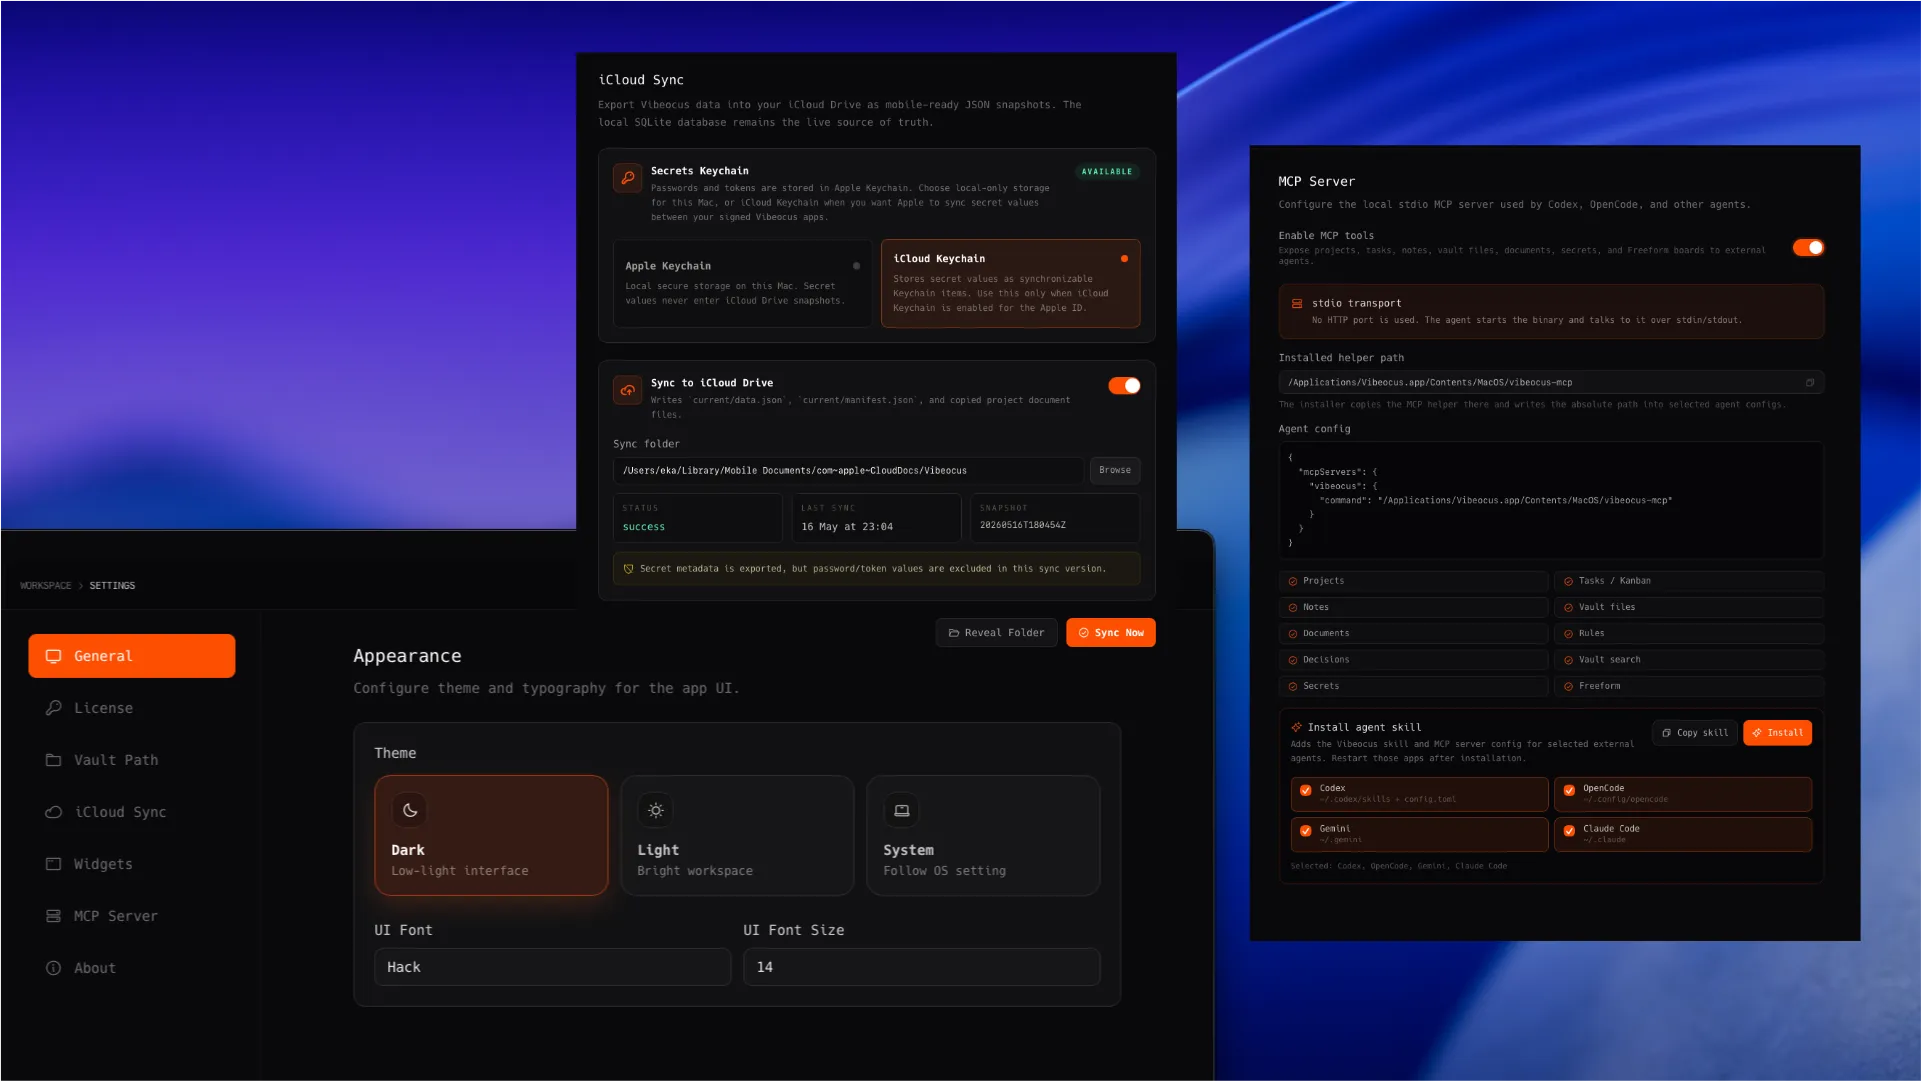
Settings
Settings control app appearance, iCloud sync, MCP helper installation, skill installation, and other workspace-level behavior.
How to use it
- 1Choose light or dark appearance and confirm core pages stay readable.
- 2Enable iCloud sync when workspace snapshots should stay available across Apple devices.
- 3Install or update MCP tools and agent skills from the MCP settings area.
- 4Copy skill instructions manually when an agent does not support automated installation.
Important notes
Settings changes are designed to apply without a manual save button where possible.
MCP helper updates should stay aligned with the packaged app version.
Product screenshot
Settings page with appearance, iCloud sync, MCP tools, and skill installer
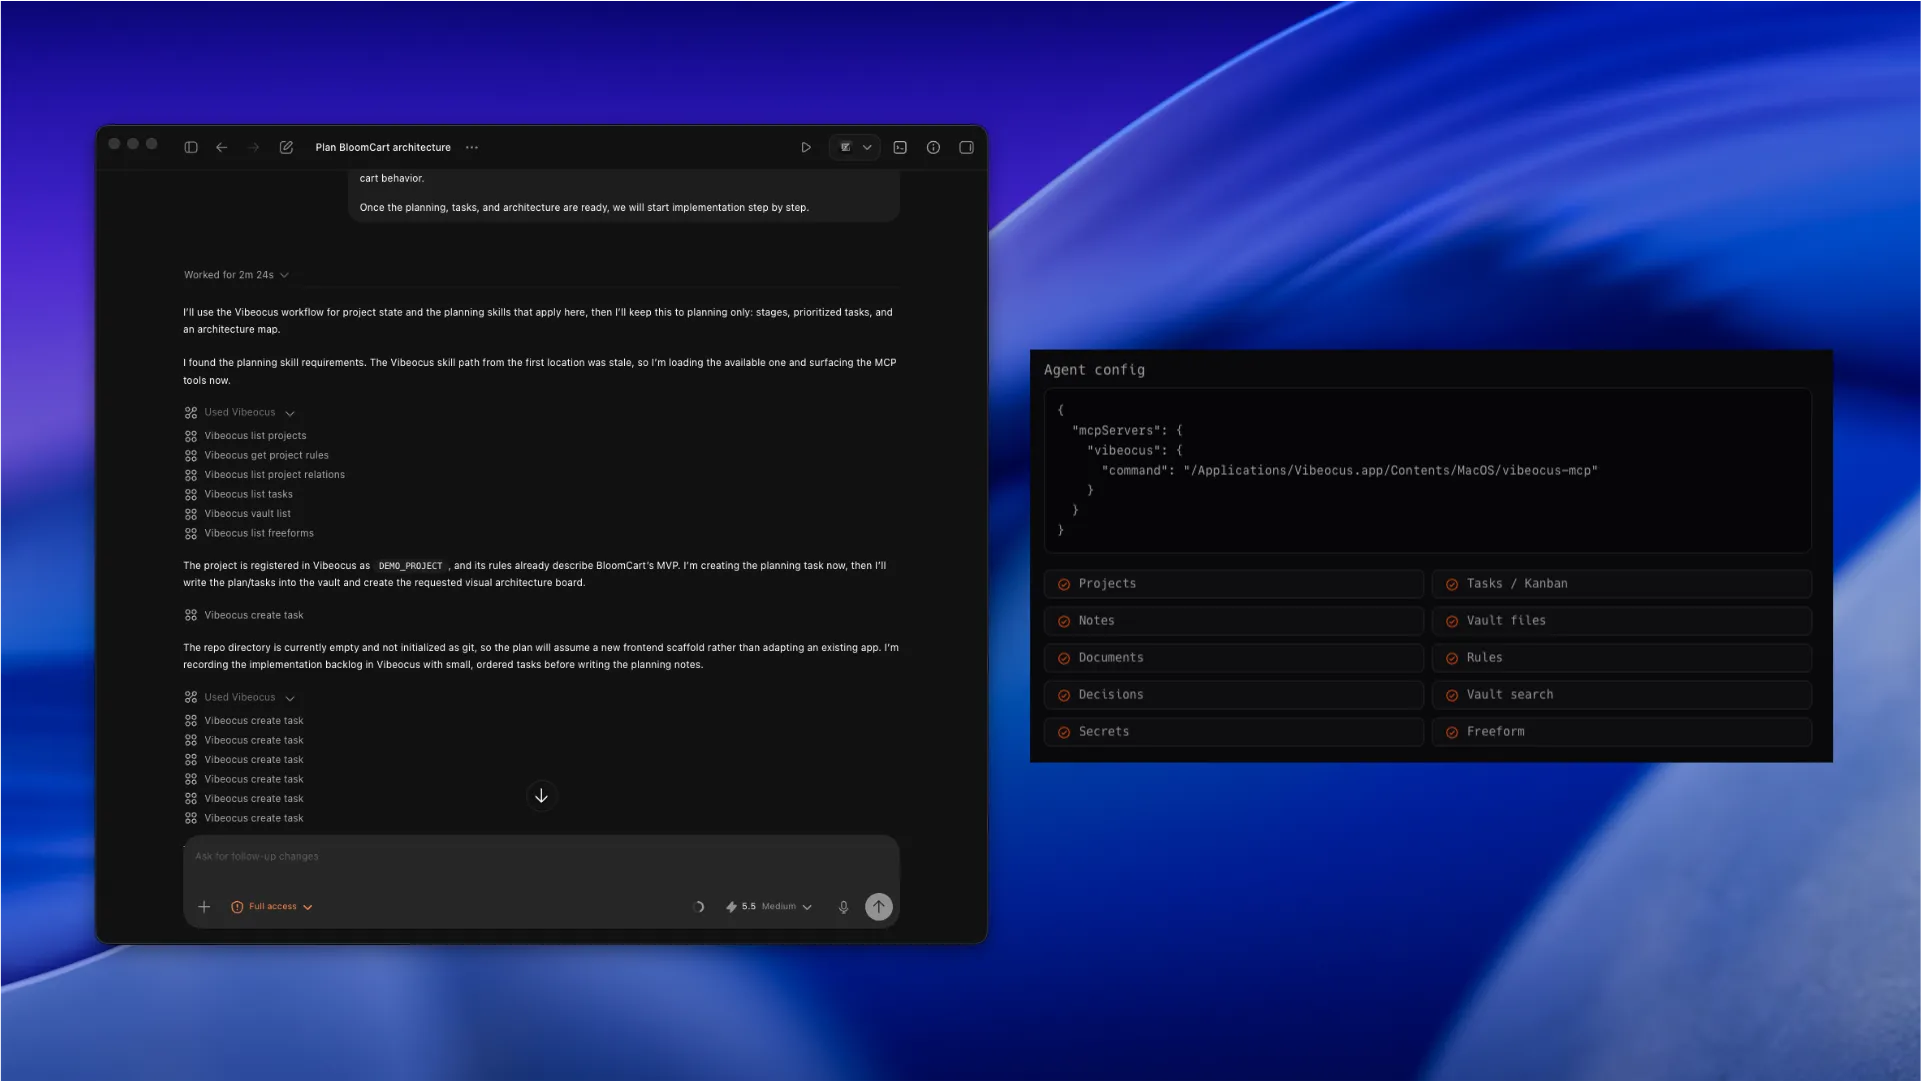
MCP and agent skills
The MCP server exposes Vibeocus as the source of truth for agents. Skills tell agents how to read project rules, active decisions, relations, tasks, and other project context consistently.
How to use it
- 1Install the MCP helper from Settings.
- 2Install skills for Codex, OpenCode, Gemini, Claude Code, or another supported agent.
- 3Agents should list projects, match the current repo, read project rules and active decisions, list relations, list tasks, and update the active task before work.
- 4Use compact skills for models that do not reliably follow long instructions.
Important notes
The MCP server includes project rules, relations, tasks, notes, vault files, documents, secrets, settings, and Freeforms.
External boards or guessed folders should not replace Vibeocus state.
Product screenshot
MCP settings with installed helper, tool list, and skill installer
License and activation
Licensing explains how a customer buys Vibeocus, finds the license key, downloads the Mac app, activates the desktop app, and manages billing or devices from the website account.
How to use it
- 1Buy the annual license from the website checkout.
- 2Open the website account with the same email used during checkout.
- 3Use Licenses and devices to reveal or copy the license key if the email is missing or hard to find.
- 4Download the macOS app from the account dashboard download block.
- 5Open Vibeocus on the Mac and activate it with the purchase email and license key.
- 6Use Billing Portal for invoices, payment method changes, and subscription management.
- 7Detach an old Mac from the device list when the customer needs to move the license to another machine.
Important notes
The annual license includes two Mac activations now. The iPhone companion app is included later when it is ready.
License keys are delivered by email, recoverable from the account dashboard, encrypted on the website, and stored securely in the macOS Keychain on the device.